At this point in my second bra project, I’ve chosen my pattern and assembled fabrics from my scrap stash, incidentally creating a color palette in the process.

Now I just need to add the remaining bits and pieces that go into making a bra: channeling (this is what houses the underwires), strap material, elastic trim (for both bra and panty), powernet fabric (for the back band), and the back closure for the bra.
And here is where I come crashing right up against the dreaded, frustrating, tear-my-hair-out question:
How do I get all the parts to match?
Ah, yes. With my very limited bra-making experience, I’m tempted to think that I’ve got to stick to the black, white, and possibly (if I’m lucky) ivory— the colors most commonly available for virtually all bra-making notions. But then the color-palette creator in me jumps into the fray and whines, “But why does it all have to match?” Let’s see, shall we?
Option 1: Own the contrast. Here’s where I could just use one of the available colors, matching be damned. Actually, in this particular case, that might not be too difficult, since one of my main fabric colors is black.
Problem: I don’t have channeling, strap elastic, or a back closure that’s black. (Sew Sassy, a great resource for lingerie-making supplies, does have all these in black, but at this point, frankly, I don’t want to wait for more parts to be shipped. I want to make this bra!)
Option 2: I dye today! (Yes, you should pardon that expression.) And while I’m at it, I think I’ll also dye a few pieces of fabric, just to see what happens.
Note: I’ve written a fair amount about my yarn-dyeing adventures already (on my Changing Your Clothes blog), so I won’t go into unnecessary detail here about the process; this post in particular has some useful information about different types of dyes, as well as links to my favorite dye resources. Please leave me a comment if you’d like more details.
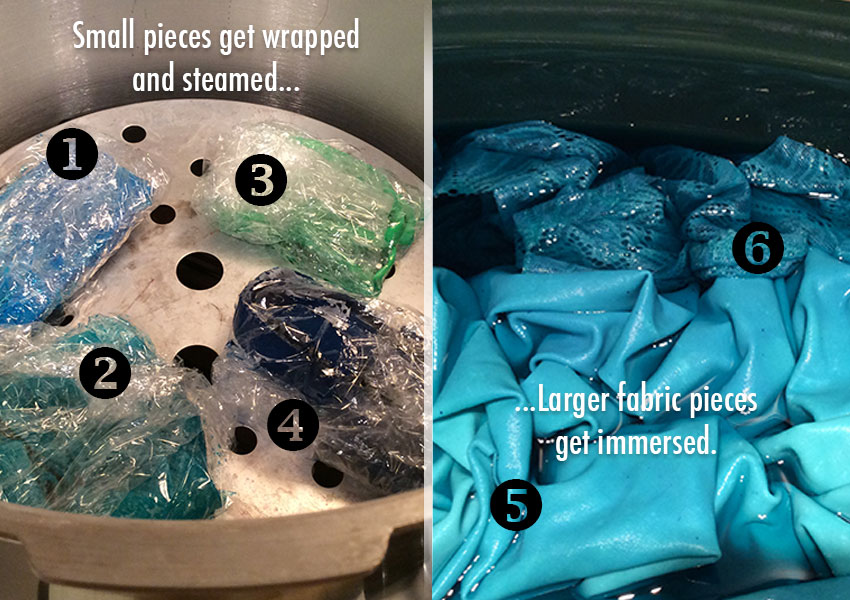
Here are my materials, au naturel:

And here they are again, in process of being dyed. (Please see #1 at the end of this post for a few notes on the dyes and the different processes.)
Aside: I suddenly feel the urge to insert a disclaimer. This post is not intended as a how-to-dye primer; I just want to show that dyeing is an option for customizing your hand-made lingerie. Please see #2 at the end of this post for a link to some great dyeing tutorials. End of aside.
After rinsing and drying, here are my beautiful hand-dyed fabrics and notions:
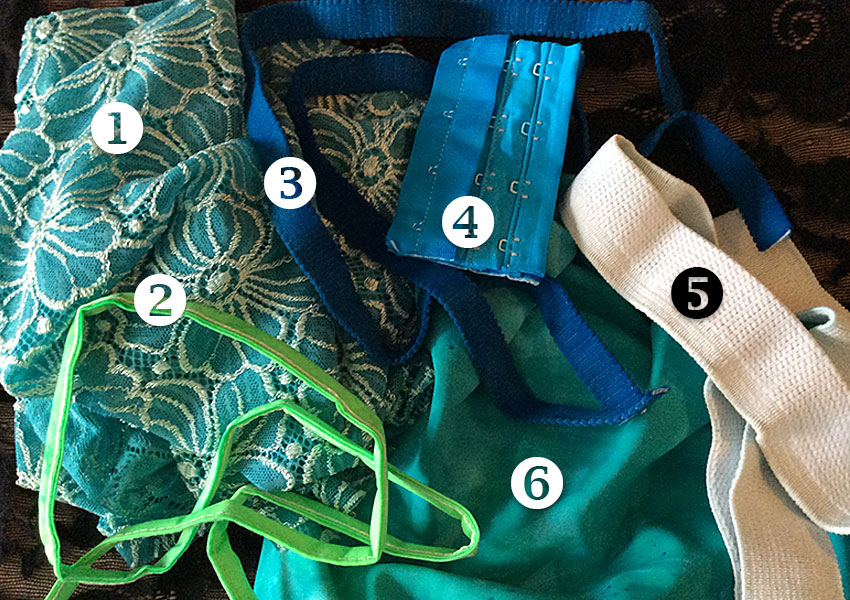
Finally, you can see here how all my newly-dyed pieces go with my main print fabric:

I’ve also gotten some black rings and sliders for the bra straps, as well as underwires, so, with the addition of my pretty custom-dyed pieces, all my materials are ready. Next, I’m going to experiment with dyeing different materials all in a single color, then I’ll get my pattern pieces cut for my second bra, and then (finally) start sewing!
NOTES:
1. Since I also produce a line of hand-painted yarns, I’m quite familiar with the use of acid dyes, which are used for animal fibers (wool, silk, etc.) and for nylon. The materials I’m dyeing here are mostly 100% nylon; the stretch lace fabric is 80% nylon/20% rayon, and the panty Spandex is 80% nylon/20% Spandex (a nylon derivative).
The acid dyes I’m using here require heat to permanently bond the color, hence the steaming and crock-pot immersion. (And please note that a primary safety consideration is that I never use these pots for food preparation.)
Rayon, cotton, and other plant-based fibers use the fiber-reactive type of dye. Rit dyes (which I love, by the way) are the “union” type of dye, so-called because they’re a combination of acid and fiber-reactive dyes, so they can be used to dye a wide variety of fibers.
2. For actual instruction, let me direct you to Dharma Trading; this is where I get all my dyes. (The link will take you directly to their Techniques page.) There are quite a few good tutorials, including videos, ranging from absolute-beginner techniques to more advanced dyeing processes.

[…] pieces were dyed with an acid dye; see Notes at the end of my previous dyeing post for more information and links about […]
LikeLike
[…] After choosing my pattern, deciding which fabrics to use, and dyeing notions and more fabrics to coordinate, now I’m on to the really fun part: sewing it all together! […]
LikeLike
[…] We’ll go step-by-step through making a coordinating panty, which will incorporate fabric I hand-dyed along with the bra notions— don’t miss […]
LikeLike
[…] 4. Too difficult to find matching elastic, straps, closures? With apologies to Nike, just dye it! […]
LikeLike
[…] back closure, rings & sliders for the straps, and channeling for the underwires. Spoiler alert: I may have to dye. That’s up […]
LikeLike
[…] more about dyeing your lingerie materials, see these posts: All the Pretty Pieces: Dyeing to Match (or Not), and All the Pretty Pieces, Postscript: Dyed to […]
LikeLike
[…] (for my first thong), continuous hook-and-eye bra back closure tape (on all of my 4 bras, including dyeing the tape for 2 of them), and super-soft bra strap elastic, which I’ve dyed to use on my second and […]
LikeLike