After making both my first bra and the second with the same pattern (the Marlborough Bra from Orange Lingerie), and making them both mostly out of silk, I’ve started to feel the urge to try something different. Completely different.
Here’s what I have in mind:
1. Instead of making the bra first, then trying to find stretch panty materials to coordinate, I’m going to pick my panty fabric first, then use that for the bra as well. This will mean using (gasp!) a stretch fabric for the bra, rather than woven.

2. I’m going to use a different pattern. Exhibit A:
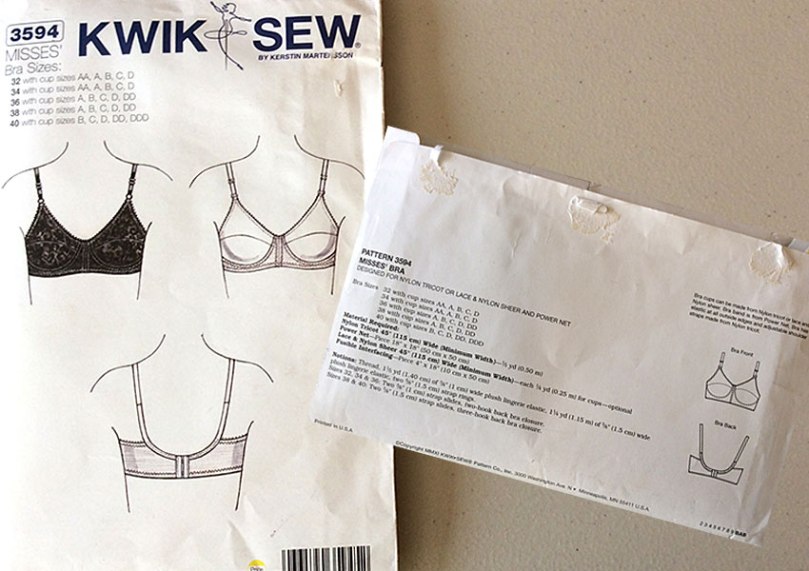
3. I’ve now made 2 high-waist panties, and 1 lace-trimmed thong, so I’m going to make a bikini-style panty this time. (This is one of 4 panty styles included in Kwik-Sew 3881, which I also used for my thong.)
Wondering what’s wrong with using a stretch fabric for a bra? Me too. After all, using the panty fabric for the bra means instant coordinated set, right? Is there a reason why so many bra patterns specify non-stretch fabrics, when most ready-to-wear bras seem to be made of stretchy materials?
Yes, apparently. From what I’ve read so far, unless you’re going for a soft bra (or bralette, as they’re now being called) look, in general, you don’t want to use stretch fabrics for a bra. Why not? Because, especially for well-endowed women, they just won’t provide any support. Think about it: a fabric that’s stretching to accommodate your body is probably not doing anything to mold, shape, or even contain your body; it’s just going to go wherever the flesh goes. (Hint: gravity.)
So what I’m going to do is stabilize the stretchy jersey fabric for making the cups of my new bra. (This pattern specifies using powernet for the entire band, so the jersey is only going into the cups, including their linings.)
To coordinate with the 3 materials in the photo above, and fill out my color palette, I dyed the rest of my materials. Believe it or not, everything was dyed in the same color bath (Fuchsia liquid dye from Rit); the varying fiber contents resulted in shades ranging from palest pink (the rings and sliders for the straps) to deep rose-red (panty and bra elastic trims).

Of these, I dyed everything but clear numbers 3, 8, & 10. I personally love the unexpected range of colors that came out of that single dye bath— it gave me a fantastic tonal palette with minimal effort!
The only additional material I need is something with which to stabilize the jersey for the bra cups. I decided to go with a sheer fusible tricot, partly because I thought it wouldn’t fight with the stretch of the fabric, and mostly because I had some on hand.

Tip: For this project, since I was going to be working with a very flexible fabric, I decided it would be easier to stabilize the whole fabric piece before pinning and cutting the cup pieces.
Before I sew the upper and lower cup pieces together, I need to decide what to do with my lace trim.

Aha! I thought of a third possibility!


So far, I’ve pretty much followed this pattern as written; stabilizing the cups is the only variation. Now I’m going to go a little further off the beaten path, with the following changes:
1. I’m going to put underwires in (the pattern doesn’t call for them). This means I will also have to add channeling (the pattern specifies covering the cup/band seams with tricot strips). This may also complicate the order of things, e.g. do I sew on the elastic trim before or after putting the wires into the channeling?
2. The pattern actually shows fabric straps in front, with elastic attached in the back. I’m not cutting fabric straps; instead, I’m using a combination of strap elastic and my fuchsia satin tubing to try something new.
I’m going to take a little break, and I’ll show you how I finished this bra in my next post. Stay tuned, bra-lovers!

[…] that I’ve got my cups sewn into my third bra project, it’s time for one of the main things I’m doing differently than the pattern (Kwik-Sew […]
LikeLike
[…] up: I’m starting on my third bra project— and it’s going to be totally […]
LikeLike
[…] I meant my fourth bra! For my third, I know I said that was something completely different, and it was, especially compared to my first […]
LikeLike
Lindy, do you think that this pattern would be a pattern that a person could alter the cup down a couple of cups sizes, and have it look and feel good? Elaine
LikeLiked by 1 person
Since this pattern is meant to be made without underwires (I added them to mine), my guess would be that this bra would actually work better for smaller cup sizes. And the band could easily be extended to make it more of a longline style, which would be very attractive.
LikeLike