My last post was an introduction of sorts to my current project: The Little White Bra, a.k.a. The Bra Before Dyeing (or just “Before”). Now, since this was the first time I’ve used this bra pattern, I’ll show you how I made it, including a few changes I made.
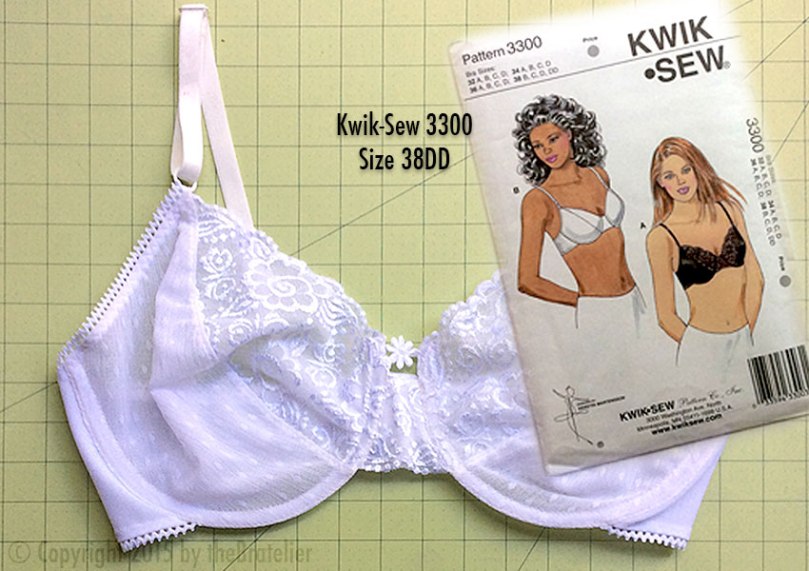
My pattern is Kwik-Sew 3300— I’m being adventurous and trying my first partial-band bra! For those of you who might not know the difference (and I’m not sure I noticed it myself before I started making bras), partial-band just means that, rather than a continuous band running all the way around the bra, including under the cups, the band comes around from the back to attach to the sides of the cups only, with a small bridge piece connecting the cups in the middle, like so:
Because I was already planning to dye this bra after sewing it together, the most important part of planning was to choose dyeable fabrics. Lest this sound terribly obvious, the truth is, if you just go by the scanty instructions on many dyes, you might get the wrong idea about the types of fibers you can dye with them. I have a lot of experience with dyeing yarn, mostly with acid dyes, which are suitable for animal fibers and nylon, so for this project, I’m aiming for as many nylon-based materials as possible. Some, like the back closure and the flower embellishment, have less than 100% nylon, so I anticipated some parts turning out slightly different shades. That’s okay— I’m not really going for a spray-painted look.
Note: I’m not going to show every single step of making this bra in detail here; I’m focusing more on the things I did differently than the pattern. Do let me know if you have questions about this pattern and/or project!
- Upper cups: 1 layer stretch lace + 1 layer non-stretch cup lining
- Lower cups: 1 layer Swiss dot (stretchy mesh fabric) + 1 layer non-stretch cup lining
- Bridge (between cups): 1 layer stretch lace + 1 layer Swiss dot + 1 layer non-stretch cup lining (I used all 3 layers for extra stability here)
- Bands: Power net fabric
- Channeling: Plush-back channeling
- Straps: 5/8″-wide strap elastic (moderately stretchy)
Here’s everything I’m using for my first LWB:

After tracing my pattern pieces, I’m ready to start cutting, beginning with the lace:

You know I love a good mock-up! Actually I only started doing this when I started making bras— it is really helpful for visualizing how things go together, especially when you’re working on something unfamiliar. Here’s my first layout:

The first thing I’m doing is attaching the cup lining to the upper cups. This is different than the pattern, so I’m showing you here what I did:

After stay-stitching the lining pieces to the lower cups and remaining sides of the upper cups, I sewed the upper and lower cups together, pressed open and topstitched these seams, then started working on the bridge. This is different than the pattern too; the pattern specifies stabilizing the upper edges of the cups near the end of construction, but I’ve already stabilized these edges with the cup lining material, so I’m going to sew a seam (right sides together) to join the top of the lace bridge piece to the 2 lining layers (1 cup lining, 1 Swiss dot); after stitching, I turned the piece to the right side:
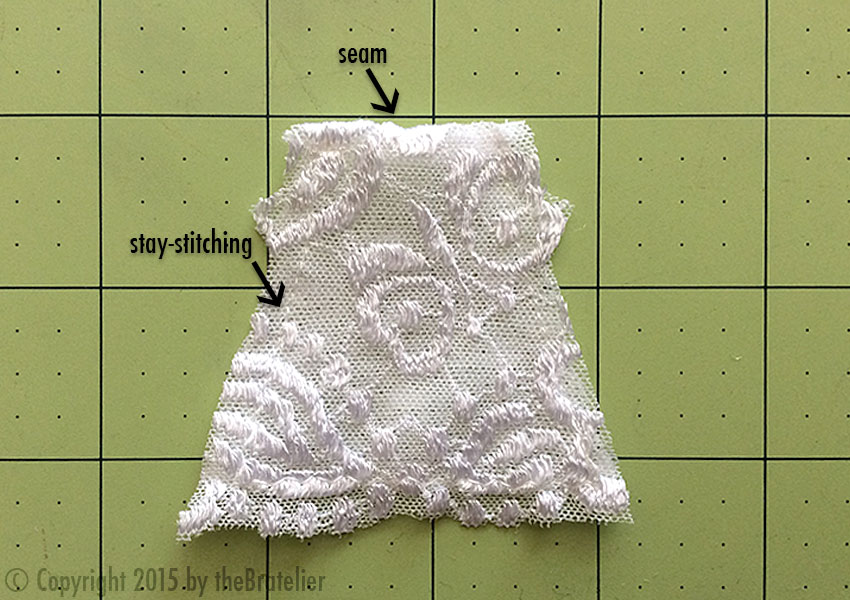
Tip: Here’s the thing about sewing that seam at the top of the bridge: it means the bridge piece won’t come up as high on the cups when I sew the bridge to the cups. This was only an issue for me later, because when I put in the underwires, they came up above the top of the bridge, creating a small gap.

From this point on, the only other thing I did differently than the pattern was that I used strap elastic, rather than making my own straps from fabric. I also slightly altered the placement of the strap at the back band; instead of having the straps go straight down to the band, I wanted a slight angle, to make the straps less likely to fall off my shoulders (I hate that). Here’s how I did that:
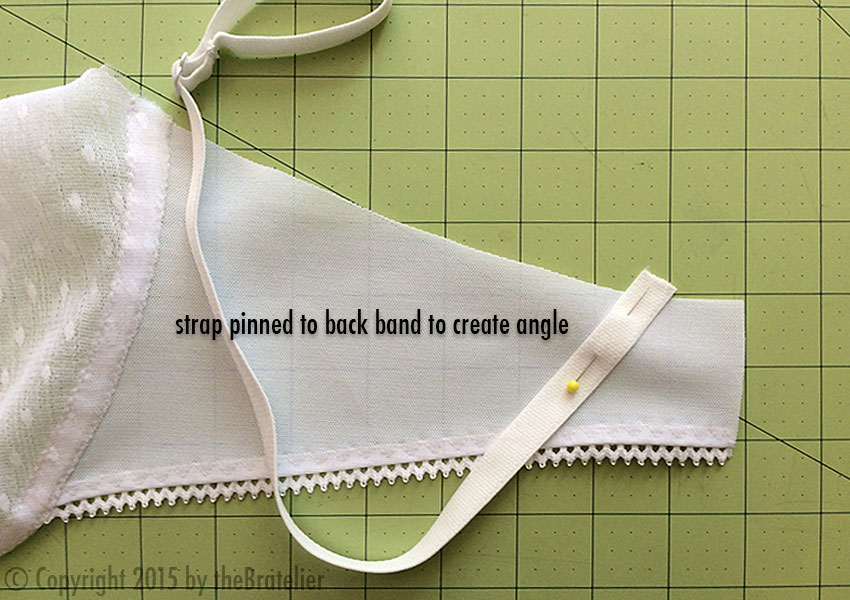
And here’s my custom-angled strap after the first stitching pass to apply the elastic trim:

Remember that gap created by sewing the seam at the top of the bridge? Here’s how I dealt with that (and may I just say, “Ha!”):

Here’s a look at the back of my finished bra, giving you a good view of those angled straps:

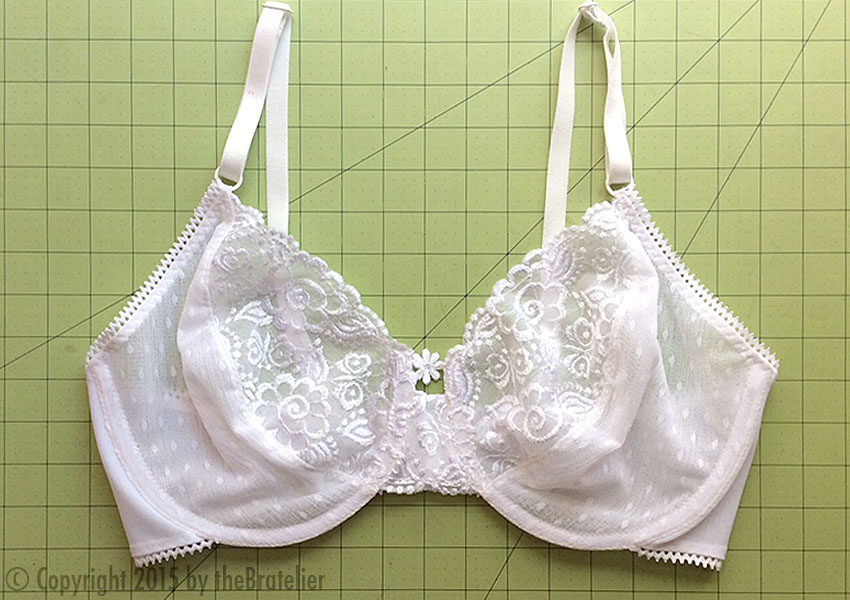
Ta-da! Here’s my completed Little White Bra:
Next in this series: I’ll show you how I ombré-dyed my Little White Bra!
UPDATE: Kits to make this very bra are now available!
Resources:
The pattern is Kwik-Sew 3300, View A.
The flower embellishment, power net, and Swiss dot fabric came from my local fabric store, Mill End.
The heat-sealed back closure, plush-back underwire channeling, strap elastic, and non-stretch cup lining all came from ArteCrafts.
Underwires and rings/sliders are from Sew Sassy. (Sew Sassy also carries Kwik-Sew patterns, and this is where I found my copy of this bra pattern, but checking there today, it appears to no longer be available.)

I think it turned out delightful! I love the lower look of the bridge and the flower tie in! I like this pattern. How did you find the other kwik sew pattern you’ve done, the one with the seam in the bridge, to be different to this pattern, and which one did you prefer? Elaine
LikeLiked by 1 person
Well, the obvious difference is that one is full-band and the other is partial-band. And it’s hard to make a fair comparison because the full-band one turned out to be too small. I followed the pattern recommendation to use my RTW bra size (36DD), and both the cups and band were small enough on me to make it uncomfortable. So I decided to go up to 38DD for the partial-band style, and it fits me nearly perfectly! The only thing I would change is bringing the underwires a little closer together at center front, but that’s it!
LikeLike
Nice pictures with very good explanations.
LikeLiked by 1 person
Your treatment of the center bridge is elegant! I really like the picot elastic trim with deep “v” edging. Where did you find it?
LikeLiked by 1 person
I got that trim at a local fabric store, but I think I’ve also seen it as sewsassy.com.
LikeLike
[…] up: I’ll show you the making of this Little White Bra, including some minor pattern changes I made along the way. And it’ll have a link to kits to […]
LikeLike
[…] you’ve been following my first Little White Bra project, you’re probably waiting in breathless anticipation for the dyed version I promised you— […]
LikeLike
[…] words, the wires extended up the center on either side of the bridge, past the top of the bridge. (Click here to see what I did about that little […]
LikeLike
Thank you for including such detailed instructions. I have been working on this pattern. I used lace for the cups but did not line them — there was my problem. Everywhere it says the cups should be made of firm material or rigid lace. I’ve been trying to make them of stretch lace for a little more comfort — but I have not been successful. Any suggestions. Thank you. That was a beautiful bra you made.
LikeLike
I know what you mean about using the stretch fabrics— maybe we’ve just all gotten so used to everything stretching that we’re having to adjust to wearing rigid fabrics. But I’ve also found that the bras I like the best are the ones that have the least stretch; I just find them more supportive. Also, being able to stabilize a stretch fabric so it can be used for bra cups really expands your fabric choices!
You’re asking for suggestions, but I’m not sure specifically what you’d like suggestions about. May I ask if you’re a larger cup size? I ask because I’m 36DD/E myself, and so support (i.e. rigid fabrics) is really important to me, but if you’re on the smaller side, maybe that’s not such an issue. But you do say that you haven’t been successful with stretch lace, so I wondered. Of course, the major issue with using rigid fabrics is fit; we all probably have to do some trial and error and tweaking of patterns to get a custom fit.
LikeLike
Did you just use underwire channeling in this bra? Or did you actually use underwires in this bra? I know that with partial band they usually require the use of an underwire but I’m just curious.
LikeLike
There are indeed underwires in this bra— everything I’ve read says that partial-band bras MUST have underwires, and, considering the way they’re constructed, this makes total sense to me.
LikeLike
How did you attach the underwire channeling? I can’t seem to find a tutorial on the internet anywhere that shows how to do the underwire channeling in a partial band bra…
LikeLike
Just gorgeous. I so want to jump in and try…but just so afraid of failure…lol I know , I know….what could happen? I would get started.
LikeLike
Hi Carol! Believe me, I completely understand your feelings. I’d been sewing garments for nearly 50 years before I plucked up the nerve to try sewing bras! If you have any experience at all with sewing, I say, give it a try! The fit is, of course, the biggest issue, but the sewing itself is really not very different than sewing a garment, with 2 exceptions: (1) lingerie typically uses 1/4″ seam allowances, which takes a bit of getting used to, and (2) the way elastics are applied can be different than for garments. Try it! And let me know how it’s going for you!
LikeLike
Tks for the detailed explanation. Are you willing to share the pattern for a 38b bra. Kind regards
LikeLike
Hi, Anna-Marie! I do not share patterns here, but I always share links to where you can find them. My suggestion would be to check out the Bra-Making Forum on Facebook (https://www.facebook.com/groups/bramakingforum/); they have tons of resources there including bra patterns (some of which are free), as well as expert advice on anything having to do with bra-making. It’s a fantastic group that I highly recommend.
LikeLike