I know, I know, I said the Little White Project was over. But here’s the thing: Even after all the lengthy tutorials, the sewing, the dyeing, and the finishing, there are still some notes about making the Little White Bras/Panties/Thongs that didn’t make it into the previous posts. I feel, therefore, duty-bound to offer these tidbits here.
The Sewing Part: Little White Bras
- The main difference between the first one and the second is the materials used for the cups. The first has lace on the upper/center cup pieces; for the second (the colorblocked one), I used the same Swiss dot/cup lining combination for all the cup parts. This meant that I’d have to finish the top (neckline) edge of the cups, though, so I used foldover elastic for this. (Click here for my post that includes a tutorial on applying FOE.)
- The other major difference is in the bridge. For the first LWB, I unintentionally shortened the bridge by sewing a seam at the top of it; this created a gap between the top of the bridge and the top of the underwires— in other words, the wires extended up the center on either side of the bridge, past the top of the bridge. (Click here to see what I did about that little issue.)
- I also decided to put the elastic trim at the bottom of the bridge; because I’d measured and cut my trim before dyeing it, I double-checked the length to make sure I would still have enough for the rest of the bra. (Notes to self: Good thing I always cut a little extra. This looks great! Must do again!) When I look at the bra as a whole, this really helps to make all the colors and trim work cohesively.
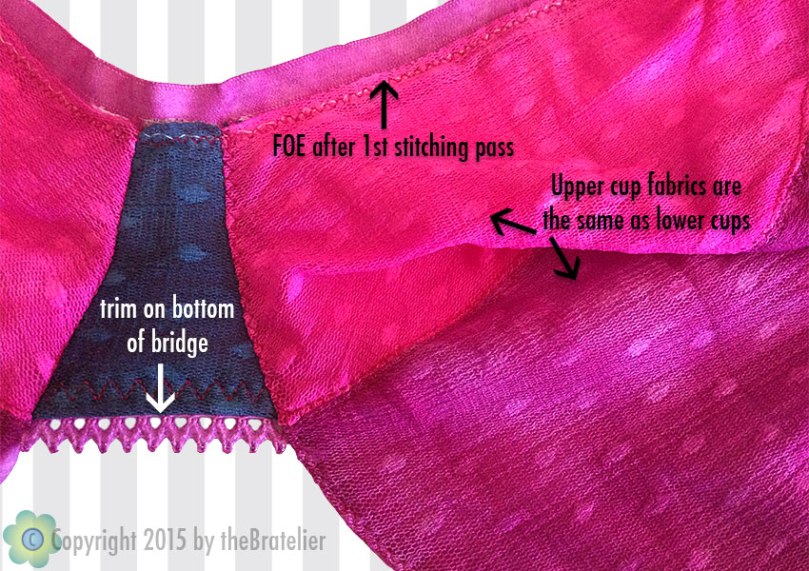
The sewing differences in my second LWB. (For this, I dyed the separate bra pieces before sewing them together.)

The Dye-IY part*: As I’ve said, this project has been mostly about experimenting with different ways of applying colors to my lingerie. With just 3 palette colors (fuchsia, magenta, and deep blue-violet), these 5 pieces represent:
- solid-color dyeing;
- single-color dip-dyeing;
- 3-color dip-dyeing of finished panties and bra;
- the other bra and thong pieces were dyed first, with the same 3 dye colors as the others. then sewn together.
That’s a lot of variety from just a few hues— resulting in a mini-collection in which all the pieces coordinate!
*Click here for more about the dyeing process.
Tip: You can apply the tutorials for the ombré-dyed bra, thong, and solid panty to your ready-to-wear lingerie too! Just be aware that, unless you’re starting with white pieces, what you’ll be doing is over-dyeing, that is, adding color on top of the original color— so your results may be unexpected! You can take advantage of this by using the original color as a starting point for your color palette. Personally, I’d love to try this with the dip-dyeing (ombré) technique; for example, if I started with a pale pink bra, I might want to leave part of it the original color, then dip-dye about 2/3 of it with gradually darker shades of pink, maybe into red…
The Grand Finale: My Little White Project pieces, finally together for a family reunion! Seems like only yesterday…

I’ve learned my lesson: Don’t say it’s over! Even now, I’m contemplating new Little White Things to try and dye…

I LOVE everything you have done here. The explorarion of different dyeing techniques, the different styles of garment and the end result – coordinating undies that are soooo much more than if you bought coordinating undies In a shop 😍😍😍❤️❤️❤️
LikeLiked by 1 person
These are all so great! I love the co-ordinating colors rather than everything matching exactly. It gives you more versatility in choosing what you pick to wear. Love it!
LikeLiked by 1 person
Hi,
Please forgive my leaving this in a comment, I couldn’t find an e-mail address for you.I recently made a list of bloggers who sew bras, in order to make them easier to find. You can find it at http://iammsfrizzle.blogspot.com/2014/10/bra-sewing-bloggers-by-size.html I hope you don’t mind being on it, please let me know if you want to be removed. Thank you!
LikeLiked by 1 person
Thank you for including me! It’s a great idea to organize the list by size (I’m 36DD in ready-to-wear, in case you want to put me in that part of the list).
LikeLike
Thank you! We’re actually the same size.
LikeLike
[…] okay, I know I said the Little White projects were all done. And technically, they are: this project is the Little Black & White […]
LikeLike