Okay, okay, I know I said the Little White projects were all done. And technically, they are: this project is the Little Black & White Bra!
And it’s also my first front-closing bra; I’ve been wanting to do this for a while now, mostly because I wanted to try making a bra with something beautiful on the back, a very popular lingerie look right now. So even though I’m starting with Elan’s B510 pattern, it won’t look much like that by the time I’m done! Or at least not in the back. Fair warning.
Here’s the back of my almost-finished LBWB:

Changing the pattern: For the most part, I didn’t make changes to the front of the bra, other than sizing. This is my first time using an Elan pattern, and the instructions (which I have to say are minimal) didn’t offer any sizing guidelines at all. The largest size included was 40DD; I’m 36DD in RTW, but I’ve made enough bras now to know it’s better to start larger and work down if possible. But when I looked at the pattern pieces, they looked suspiciously small, so I made a partial muslin and pinned it onto one of my Marlborough bras, which fits me really well:

Something that I’ve noticed consistently across the several bras I’ve made (and several different pattern companies) is that I always have to alter the cup seamlines, whether these are horizontal, vertical, or diagonal. The rule I’ve read (and agree with) is that no matter what the orientation of the seamline, it needs to pass over the apex (the delicate term for nipple); in the bras I’ve made so far, the seamlines have all been too far to the outside of the cups. So in this case, since I had to make the entire cup bigger anyway, I added an additional 1.5″ to the top seamline of the lower cup piece, in order to also move that seamline towards the apex.
After playing around for a while with using black and white elements in different parts of the bra, here’s my mock-up:

Tip: I just guessed at how long to make the back lace panel, cutting it 12″ long (shown here), but after the bra was finished and I tried it on, I felt it came up too high on the back of my neck. I redid this part, cutting 3″ off the lace panel; you can see the results at the end of this post.
Sewing the back: Although the back of this bra will end up looking quite different from the one the pattern shows, I didn’t actually have to change the pattern; I’m just adding the vertical lace panel, and will attach the straps to that, instead of to the lower band.
Since the center panel is a stretch lace, I decided to stabilize the vertical edges.
Tip: The stabilizer I used here is called Seams Great. It’s a 5/8″-wide sheer nylon tricot bias strip. I also use this frequently to stabilize the top line of upper cups, especially when they’re made of a single layer of lace.

Because of the trims that would go on the top and bottom of the lower band later, I had to think carefully about the order of the next few steps. First, I basted the lace panel to the lower band, on the bottom of the band only:

Next, I added elastic trim to the lower edge:

Tip: One thing about sewing garments with more than 1 color: be prepared to change thread colors! In the above photo, for my second stitching pass (the one that shows on the outside), I changed to white thread in my bobbin when I got to the lace panel; I used black thread for the rest.
Sewing the cups: Because I’m lining the lower cups only, I’ve decided to sew all the layers together at once to enclose the seams. Here’s how to do that:

The cup seams need to be clipped because of the curve:

The finished cup:

Now it’s time to attach the cups to the band:

Now I’m going to work on the front closure.
Tip: I’ve generally avoided front-closing bras, mostly because they create too much space between my breasts. For this bra, I want to be able to bring the cups as close together as possible; you should adjust your own according to what works best for you.
Because of the size of my front-closure hook, I’ve decided to use 2 pieces of smooth (not plush) underwire channeling to join the hook to the bra:

After attaching these to the bra cups, here’s what it looks like on the inside:

And from the outside:

Again, I’m having to think a lot about the order in which to get things done. I need to get the elastic trim on to the upper edge of the band/underarms before putting the straps on in front, but I can’t do that trim until the underwire casings are in place, so I’ll do that next.
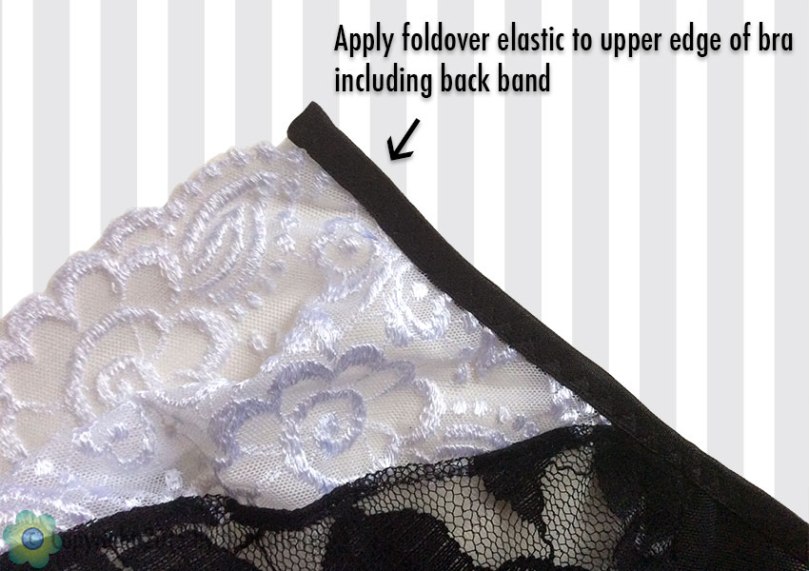
Now I can put on my trim, which in this case is foldover elastic (FOE):

Now that the upper edge is finished with FOE, I can secure the lace panel to that edge in back:

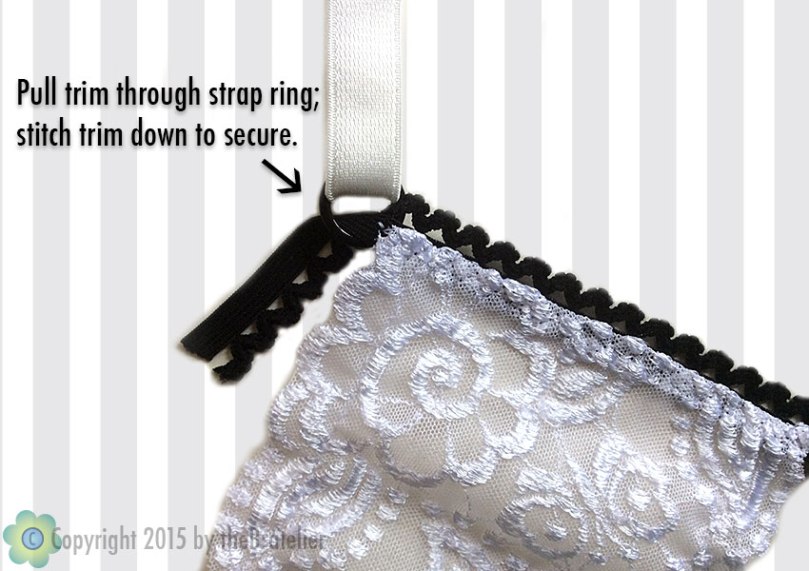
Now I just have to do the straps and finish the underwires! Oops, I need to finish the top edge of the back lace panel first, since the straps will attach to that.
Tip: If possible (you might need help with this), try on your bra at this point, to get an idea of the length of your lace panel is correct. If it’s too long, trim it to the desired length before attaching the trim.

Making and attaching straps: Assemble straps as usual, with the rings and sliders (there’s a tutorial for this in this post on Madalynne’s wonderful blog). This time, the rings are going to go in back:

I’ll finish the straps by attaching the free ends to the cups:

Tip: This front strap attachment point is the perfect place for those little embellishments that make all the difference! They’re wonderful for concealing areas that aren’t so attractive. (See mine in the next-to-last photo in this post.)
Last step: Finishing underwires: I’m sorry I didn’t think to get photos of this part of my project, but there’s nothing unusual about them. Since I closed off the underarm side of the channeling when I put on the FOE, I inserted my underwires from the center front, then folded down the ends of the casing and hand-tacked them in place on the inside.
And here it is, from the front:

Aside: Hmm— I thought it would be fun to mix 2 different laces on the cups, but now I’m not sure I like this particular combination. Funny how these things can really not be obvious until you’ve actually sewn them together. I’m thinking of making another version of this bra, using the same materials, but substituting black stretch satin for the black lace. End of aside.
And here’s the back view:

Another aside: I just noticed how many words are in this post— many more than usual! I do usually try to break up extra-long tutorials into 2 or more posts, but this one just got away from me. Guess I write like I sew— I just like to keep going until I’m done. End of aside.
Lest you think this Little Black & White Bra project is not all that different from the Little White Bra (and panty) projects, well, take a look at how those turned out! These things don’t always turn out the way you might expect. Just saying.
And if you’re wondering if I’m going in a Little White Bra—Little Black & White Bra—Little Black Bra direction… you’re right! But that will have to wait until I revise my LBWB, coming soon!

What a fun project – and a lovely bra! Thanks for documenting it all step-by-step!
LikeLiked by 1 person
It’s gorgeous! I’m glad you’re not completely done with the LBWB project. This is such a great tutorial.
LikeLiked by 1 person
What a great bra! I love the style, and a front-closure bra is definitely on my list 🙂 what’s it like to wear?
LikeLiked by 1 person
Well, truthfully, although it’s quite comfortable (I’m happy to not have the usual closure digging into my back), there’s just too much separation between the cups for me to be 100% happy with it. However, it’s wearable– there are just certain clothes I probably wouldn’t wear with it. When I do the second version, I’m going to try a new closure idea. Stay tuned! 😉
LikeLiked by 1 person
Looks amazing. I have seen other types of front fastenings – let me see if I can find a picture to send you – I too would love front fastening (once I get my first few bras sorted so I have my fit (I think your tip re the patterns and the apex is one I have in my mind now to look out for as I delve into this adventure) as I just know it would make things easier – and smoother on the back.
LikeLiked by 1 person
Have you seen this closure type?
https://www.etsy.com/listing/237228271/silk-and-lace-front-close-bralette?ref=shop_home_active_20
Wondered if it might help? Sue suemsanderson@yahoo.co.uk
>
LikeLiked by 1 person
Thanks, Sue, just looked at it! Yes, I have seen this type of closure, and I think it works well for that style of bra, because the narrow lower band connects directly to the closure. (Really pretty bra, by the way!)
My issue with front-closing bras is the extra space they create between the cups, which is mostly due to the strips of fabric that connect the cups to the closure. I took a chance with this one, since I’ve not had good luck with this style in RTW, but I think it will take some more tweaking.
Thanks again for the tip– any idea where I could find that type of closure?
LikeLike
Wow! This is so nice! I have to try something like this too.
LikeLiked by 2 people
Very pretty! You have a wonderful ability to modify a pattern and make it your own.
LikeLiked by 1 person
It’s pretty surprising how quickly I’ve become familiar with the basic process for putting together a bra. After that, it’s not difficult to change things. As I said in this post, it’s usually a matter of figuring out the order in which to get things done. The biggest issue seems to be the underwire channeling– you have to leave it open to put the wires in, but putting trim on the edges closes it up.
LikeLike
This is fantastic….thx for sharing.
LikeLiked by 1 person