In Part 3 of my second bra project, we ended after adding the back bands. Now all we have to do is add the finishing touches: elastic trim, straps, and the back closure. Then we’ll slip the underwires into place, and finish off the ends of the channeling. And I just may add a little embellishment to the center front (we’ll see).
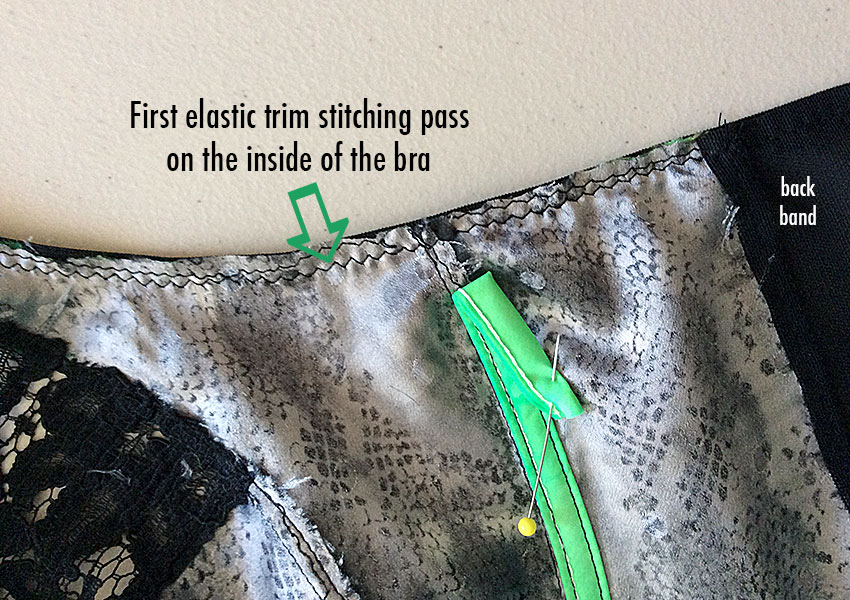
I’ll start by adding my elastic trim to the underarm/back band edge. This technique, which you’ll see on virtually any ready-to-wear bra or panty, is done in 2 separate steps. The first is to attach the elastic, wrong side facing up (very important) to the right side of the bra, using a small zig-zag stitch, and sewing very close to the inside edge— the edge closest to the picot loops.
This piece of elastic will go from the top edge of the back band (not including the scooped-out area near center back) to the end of the outside edge of the power bar.
Tip: You don’t want to stretch the elastic much while attaching it; a slight stretch going around the curve of the underarm helps to smooth that curve, but don’t stretch the elastic on the back band portion.

Here’s a look at the inside view after sewing this first pass.
Tip: I’ve pinned the channeling out of the way so I don’t accidentally sew over it! Now you can see why I didn’t stitch the channeling all the way to the underarm edge— it would have created too much bulk, added to the elastic.
Now I’m ready to finish sewing on this piece of elastic. First, I’ll flip the elastic over to the inside of the bra; you should just see the picot loops from the right side.
Important: Before you make your second stitching pass, trim the ends of your channeling (just the ones at the sides, not in the center of the bra) so that they lie smoothly under the elastic; you can finish stitching the channeling all the way up to the elastic line at this point, or do this after your second stitching pass. Here’s what mine looks like on the inside, after completing the elastic stitching:

And here’s what this area looks like on the right side, after completing the second stitching pass:

Next, I’ll repeat this process on the other side of my bra, as well as along the entire lower edge of the bra, with the same elastic. After that’s all done, let’s add the straps!

The other end of the strap will get sewn onto the curving bit at the top center back of the back band. It’s also a 2-stitching-pass process, but a different one from sewing on the elastic trim. (I’m sorry I didn’t take any photos while doing this!)
Here’s what you do to sew down the strap: After making sure your strap isn’t twisted, line up the upper edge of the strap so that it just barely overlaps the curved edge on the back band. Using a small zig-zag stitch for both passes, stitch first in the middle of the strap, then once again close to the inside edge, making sure you also sew through the fabric. (You can see the strap stitched in place in the following photo.)
We’re almost done! Now to add the back closures. I’ll just hand-baste them on first; both pieces have parts that kind of sandwich around the center back edges of the band, so I’m finding it saves a lot of frustration if I baste through all layers first.

Using a fairly tight zig-zag, I’ll stitch my basted closures into place.
Tip: Since I bought continuous hook-and-eye closure, and cut it to the length I wanted, the top and bottom edges (where I cut the pieces) were raw; I’ve read that you can just leave them as is, but there are several layers there, and I prefer to close up those raw edges with zig-zagging.

In the photo above, you can see the long ends of the channeling in the center front of the bra; I hand-basted them down after inserting the underwires. Once the rest of the bra was finished, I tried it on, and since I’m happy with the fit and placement of the underwires, I can machine-stitch the channeling into place.
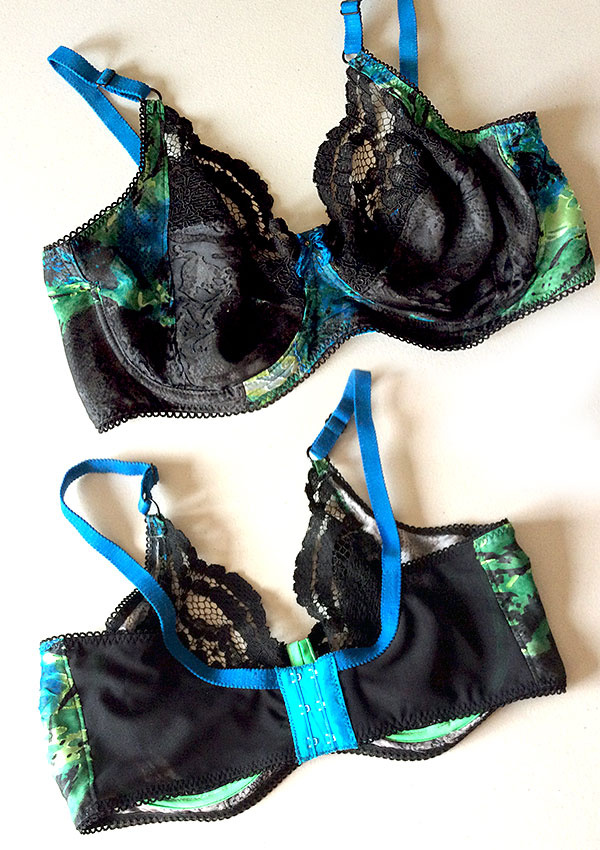
It’s done, it’s done! Here it is, front and back:
Next up: We’ll go step-by-step through making a coordinating panty, which will incorporate fabric I hand-dyed along with the bra notions— don’t miss that!

[…] my second bra, with some materials I pulled out to see if they’d […]
LikeLike
[…] that my second bra is finished, along with its coordinating high-waisted panty, I thought this would be a good time to […]
LikeLike
[…] Guess what? My new thong coordinates perfectly with my second bra! […]
LikeLike
[…] making both my first bra and the second with the same pattern (the Marlborough Bra from Orange Lingerie), and making them both mostly out […]
LikeLike
[…] hardware): straps, elastic trim, and a back closure. I’ll show you all those final bits next time, followed by step-by-step photos of making a high-waisted panty to coordinate with this […]
LikeLike
[…] I said that was something completely different, and it was, especially compared to my first and second, which were both made from the same pattern. But for this one, I went even further afield. I […]
LikeLike
[…] just in: Orange Lingerie, the source of the beautiful pattern I’ve used for my first and second bras, has just released 2 sensational new panty […]
LikeLike
[…] you know, I made my first and second bras using the same pattern, the Marlborough Bra. Considering my lack of experience, I think they […]
LikeLike
[…] the tape for 2 of them), and super-soft bra strap elastic, which I’ve dyed to use on my second and fourth […]
LikeLike
[…] you know, I’ve already made my first and second bras with Orange Lingerie’s Marlborough Bra pattern, so I can say with confidence that the […]
LikeLike
This is wonderful! I love the colors and the black lace!
LikeLike
[…] pieces, they looked suspiciously small, so I made a partial muslin and pinned it onto one of my Marlborough bras, which fits me really […]
LikeLike