As you know, I made my first and second bras using the same pattern, the Marlborough Bra. Considering my lack of experience, I think they both turned out surprisingly well. But here’s a funny thing. Even though I used the same pattern, and the same type of fabrics (silk for the main parts, powernet for the back bands, as specified by the pattern), they somehow turned out different in size— different enough that, although I’ve worn the second bra several times, I can’t wear the first one at all. It’s just too tight around the band.
With the back closure fastened on the loosest setting, my first bra measures 13″ across the bottom. And notice how the fabric is bunching up under the cups? More about that later.
In Part 3 of my second bra project, we ended after adding the back bands. Now all we have to do is add the finishing touches: elastic trim, straps, and the back closure. Then we’ll slip the underwires into place, and finish off the ends of the channeling. And I just may add a little embellishment to the center front (we’ll see).
I’ll start by adding my elastic trim to the underarm/back band edge. This technique, which you’ll see on virtually any ready-to-wear bra or panty, is done in 2 separate steps. The first is to attach the elastic, wrong side facing up (very important) to the right side of the bra, using a small zig-zag stitch, and sewing very close to the inside edge— the edge closest to the picot loops.
This piece of elastic will go from the top edge of the back band (not including the scooped-out area near center back) to the end of the outside edge of the power bar.
Tip: You don’t want to stretch the elastic much while attaching it; a slight stretch going around the curve of the underarm helps to smooth that curve, but don’t stretch the elastic on the back band portion.
After making sure your elastic side is placed with the wrong side facing up, you’ll want to align the non-picot edge of your elastic with the fabric edge. Then zig-zag-stitch as close as possible to the inside edge of the elastic. (Since I’m sewing here with black thread, it’s nearly impossible to see my stitches, so I’m representing them with the small white vees by the green arrow.)
Finally! After choosing my pattern, deciding which fabrics to use, and dyeing notions and more fabrics to coordinate, now I’m on to the really fun part: sewing it all together! Today, I’ll show you step-by-step how all the major parts are sewn together, and next time, I’ll complete my bra!
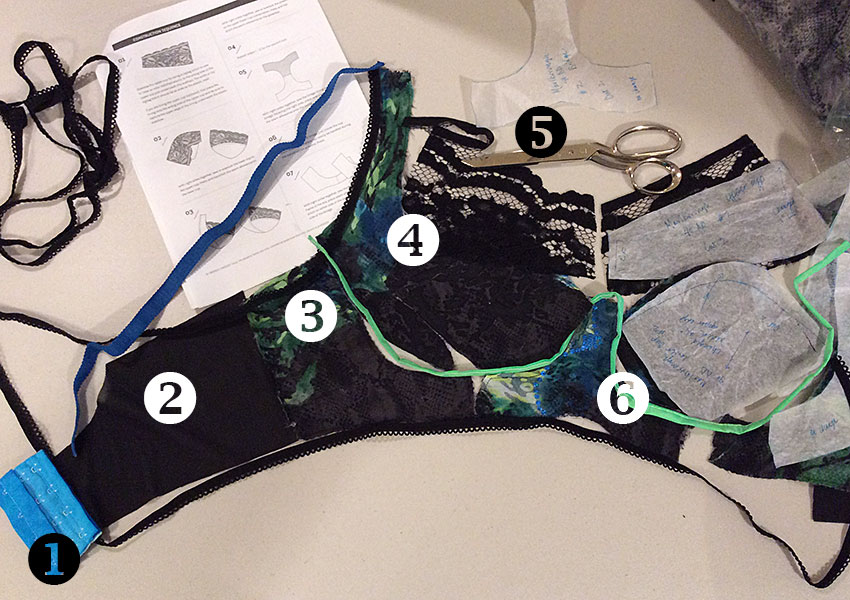
Let’s jump right in! Here, I’ve cut all my fabric pieces, and laid them out in a rough mock-up of my new bra.
Note: In the interest of keeping this post to less-than-novella length, it’s not going to be a tutorial, exactly; it’s more in the nature of a quick overview of the steps involved in constructing a bra. In posts to come, I’ll go into a lot more detail about specific aspects of bra-making. (Remember, this is only my second bra!)
Another note: In this photo, the pieces with the print fabric, which is sheer, have already been basted to a second layer of silk, for stability as well as opacity.
Laying out my bra pieces helps me visualize the finished bra. You can also see the blue straps, black elastic trim, and green underwire channeling (this will be on the inside of the bra). 1. Back closure (looks like this will need to be trimmed down). 2. Back band (powernet fabric). 3. Frame. Along with the bridge (6), the frame supports the cups. 4. The 3 parts of the cup: power bar (extending into strap), lower cup, and upper cup (lace). 5. Trimming the selvedge from the lace, leaving a scalloped edge for the top of the cup. 6. Bridge. This forms the support for the center of the bra, as well as under the cups.
Tip: Laying out the pieces in this way also helps avoid the possibility of forgetting a vital part! Don’t ask me how I know this.