
I’ve now made 2 versions of Ohhh Lulu’s Betty High-waisted Panty pattern, including this lace-overlay beauty, and I’m ready to try something new! The other day, I fished a lace thong out of my panty drawer (okay, it’s more like a bin), and it occurred to me to try modifying a thong pattern to make something similar. In this post, I’ll show you how I made the modifications, and get my pieces cut; next time, I’ll sew my thong together!
Here’s the pattern I’m starting with, Kwik-Sew 3881, which includes patterns for several basic panty styles:

My idea is to replace the upper edge of the thong with wide stretch lace. Here’s the plan:
1. Trace the original pattern on to tissue paper. (Kwik-Sew’s patterns come on paper that’s quite a bit heavier than regular sewing-pattern paper, so I always trace the pieces onto tissue or pattern paper first.)
2. Draw new cutting lines on the thong front and back pattern pieces, after determining where I want to place the lace.
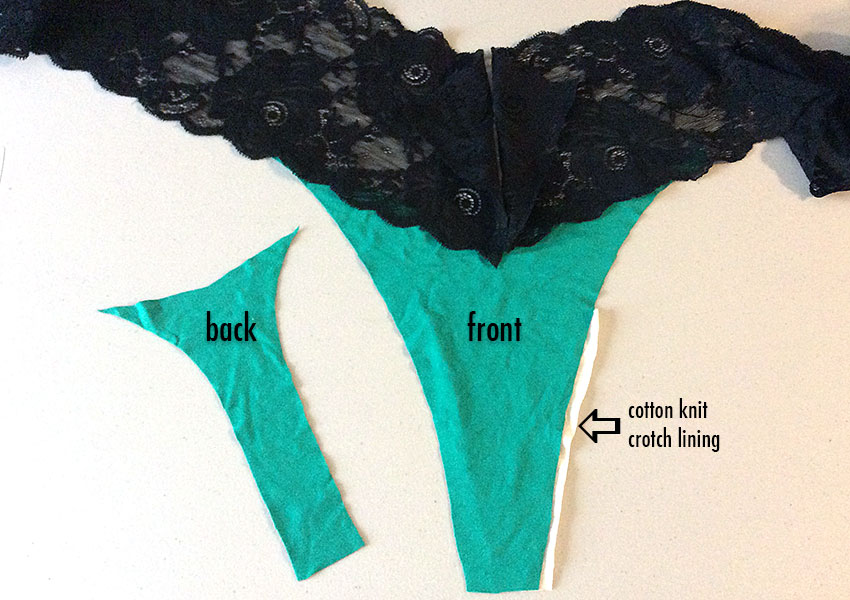
3. Cut new thong pieces from fabric.
4. Pin-mark mitered seams on lace (center front & center back).
5. Lay out all pieces, including elastic trim, as a mock-up, to make sure it all works!
First, I’m going to trace the original pattern, then figure out where I want the new cutting lines to be:
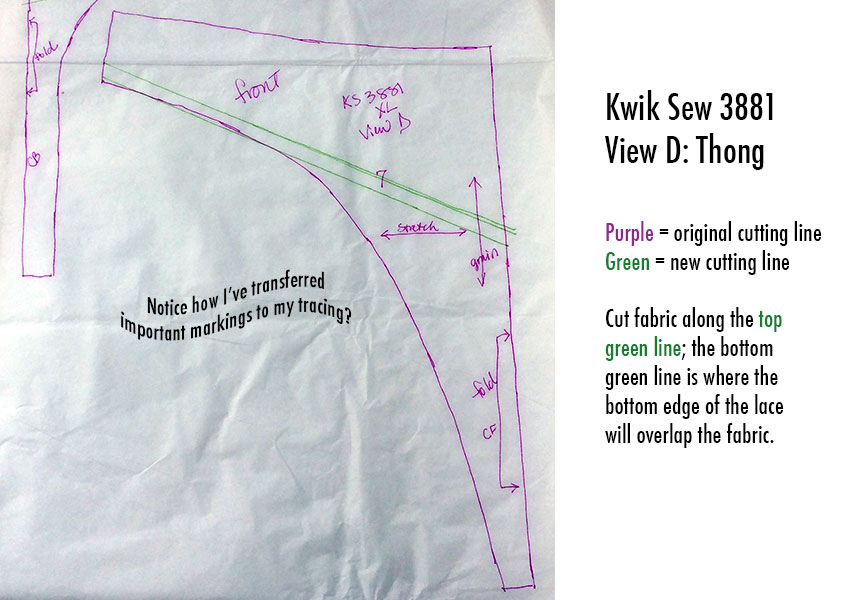
Tip: Color-coding is a great way to keep track of your pattern modifications!
Here’s a look at my lace, laid over my newly-drawn cutting line:

Tip: You could, in theory, make a deeper V with the lace in front, but I’m keeping mine relatively shallow. Here’s why: I’m not making any side seams in the lace, so the only seams will be at center front and center back. If I make the V too pronounced, the lace won’t lay smoothly as it goes around the sides to the V in center back. Make sense? The angle up from center front will have to angle back down to the center back. (At least in this case, it does; this gives me an idea, though, about maybe angling the V up in the center back…)
Note: For a look at how to size your stretch lace bands, see Size Matters: When Thongs Go Wrong.
Moving on to modifying the back of the thong pattern, I’ve drawn my new cutting line with an even shallower V than the front:

Now I’m going to trace over the modified patterns:

Hey, I’m finally ready to cut my fabric!
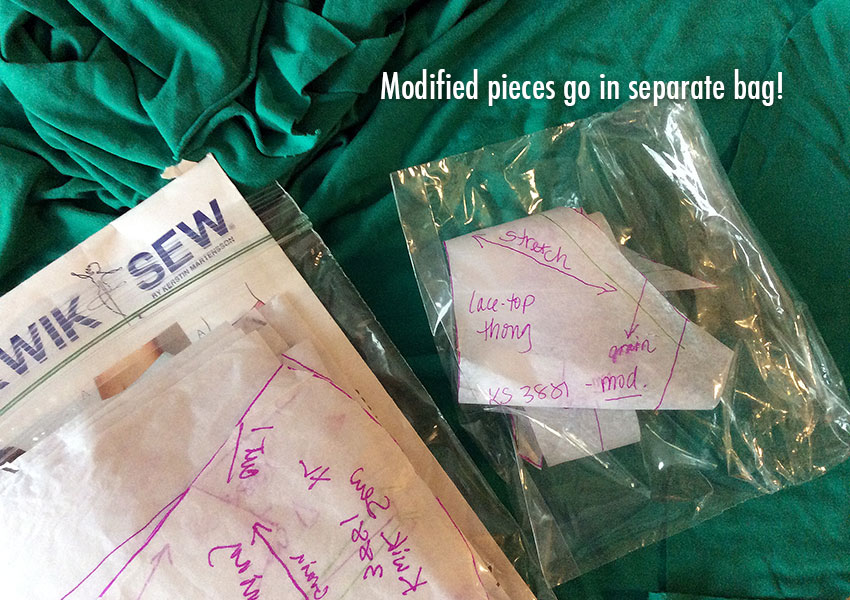
Tip: After you’ve cut your fabric pieces, take a moment to organize your patterns! Here’s how I do it:
Now that my pieces are cut and ready, I’m going to pin-mark the mitering of the lace pieces at center front:

Tip: As you can see in the photo above, I’ve aligned the scallops of both pieces of lace. It’s a really nice touch to have the scallops come out evenly and symmetrically. (This will be clear in the finished thong, if not before.)

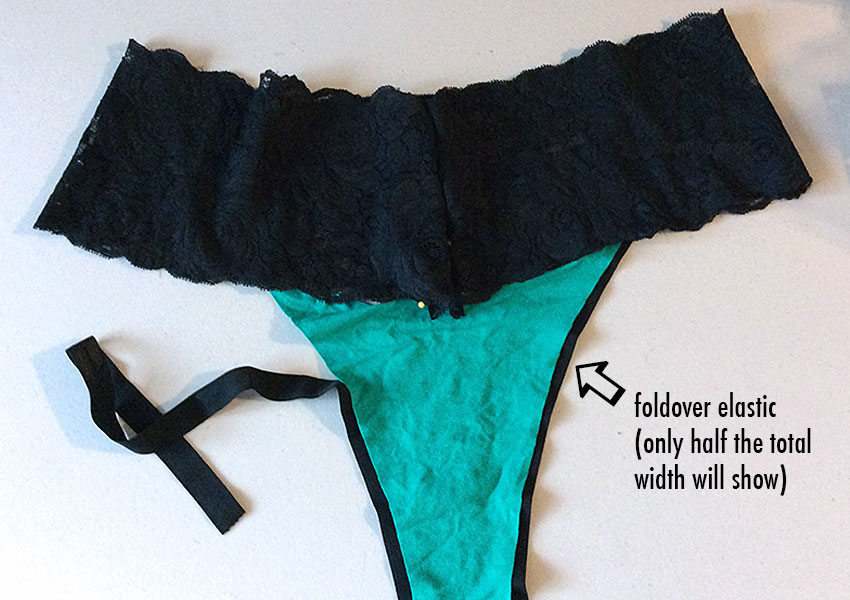
After pinning the center back lace pieces in the same way as for the front, here’s the final check:

Now let’s do a mock-up of the thong, complete with elastic trim! I’m going to try foldover elastic for this project; it’s narrow and smooth, which will hopefully make for comfortable wearing. (In my next post, when I’ll sew this thong, I’ll show you how to apply this type of elastic. Assuming I figure it out.)
Okay! The pattern modifications have been made, fabric and lace cut, lace miters pinned, and trim chosen. All I have to do now is sew my thong together— that’s coming up in my next post!

[…] doing all my thong pattern modifications and getting the fabric and lace pieces cut and ready, I’m so excited to actually sew it […]
LikeLike
[…] should trust my instincts. Even while I was making my lace-trimmed thong, I was thinking that I’d cut my lace band too big. But being so new to lingerie-making, how […]
LikeLike
[…] possible to have too many bras. Especially when you can easily make matching panties, including the lace-trimmed thong coming up in my next […]
LikeLike
[…] and high-quality materials I’ve already used from ArteCrafts include wide stretch lace (for my first thong), continuous hook-and-eye bra back closure tape (on all of my 4 bras, including dyeing the tape for […]
LikeLike
[…] for the LWT, such as they are. I’m starting with the pattern that I had previously modified; click here to see those original changes, if you want your band to be angled rather than […]
LikeLike