Today seems to be all about circling back to my early days of bra-making (okay, that was only three years ago). I’m wearing the very first bra I ever made, the hot summer weather has made me nostalgic for distant memories of wearing refreshingly cool linen, before it became adulterated with polyester and other mysterious substances that for some reason render it wrinkle-free, and nostalgia has also led me back down memory lane to the Marlborough bra pattern— the first one I ever used, and still one of my very favorites; my second-ever bra was also a Marlborough, made with silk scraps from other sewing projects, and I literally wore it until it was in shreds.
And therein, dear readers, lies the origin of The Great Linen Experiment. Read on.
Detail of my printed linen fabric. I love the unexpectedly bright colors, most especially the almost-acid yellow and the deep fuchsia pink. The occasional streaks of white, as if it had been brushed with bleach, add to the intriguing, vintage-inspired effect.
The first of my sewing-related blogs was Changing Your Clothes, covering anything having to do with making the most of clothes you already have: alterations, dyeing, repairs, wardrobe planning (via color palettes, natch), refashioning. Next in line: the blog you’re looking at right now, My Bratelier, which is focused only on sewing lingerie, including bras. So when I wanted to write posts for sew-along projects started in one of my workshops, I didn’t have an existing blog that was the right fit. What’s a blogger to do?
Silly question. Start a new blog, of course! Help me welcome SewColormusing into the Colormusing family!
It’s a bouncing baby blog! SewColormusingwill include sew-along series, special technique tutorials, and general sewing fun!
Want to know more about Colormusing? Don’t miss all my color-palette-related excitement at the A Musing blog!(Click on the dots above to visit my mother ship, Colormusing.com.)
Big news: I’m one of three bra-making experts featured in a hot-off-the-digital-press article in Seamwork Magazine!
With insights from UK pattern designer Zoe Edwards, Amy Chapman (of Cloth Habit fame), and me, writer Jessica Yen focuses on making lingerie from scraps of fabric— something I love to do!* Included are tips on everything from choosing patterns strategically to make the most of irregularly-shaped scraps to my own ideas for working with color palettes.
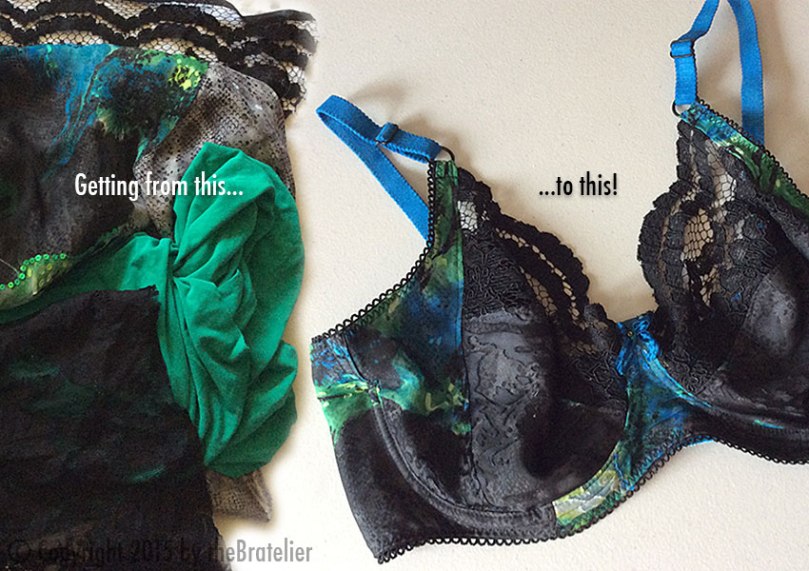
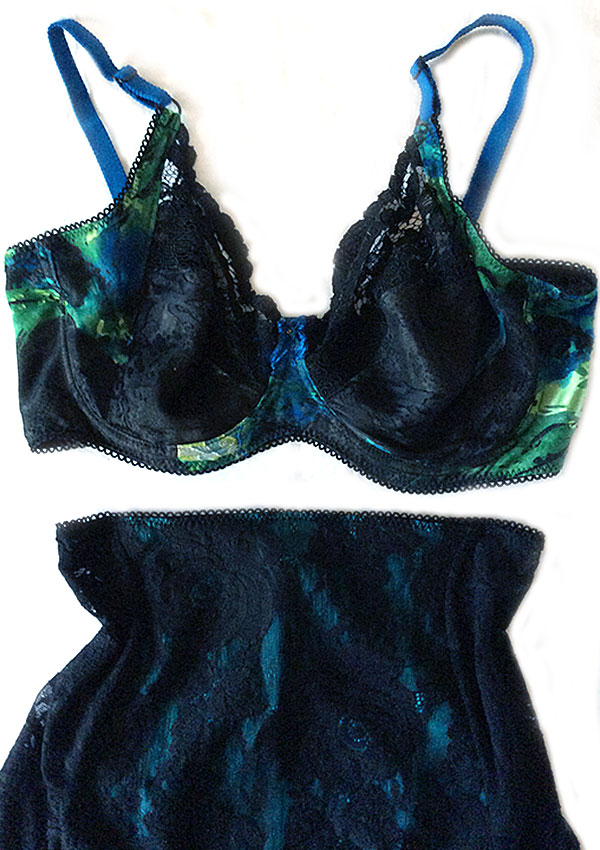
Wow, am I glad I obsessively save my scraps of beautiful silks and laces! They’re perfect for repurposing into custom lingerie. (Click the photo to go to my first post in the series on making this bra and a coordinating panty.)
I’d love it if you would visit Seamwork Magazine and read this article, along with the rest of February’s issue, which focuses entirely on intimates. And tell me what you think! Oh, and I’d be interested to hear about your own experiences with sewing lingerie from fabric scraps.
The blatant self-promotional part: Want to see my own DIY lingerie sewing kits? I design and produce them for Colormusing, and many feature materials and trims I’ve dyed myself; all include links to blog posts I’ve written with details and tutorials specific to each kit.
And while you’re visiting Colormusing, be sure to sign up to receive Hue News, CM’s free monthly e-mail newsletter, including discount coupon codes you’ll only find in Hue News!
Okay, okay, I know I said the Little White projects were all done. And technically, they are: this project is the Little Black & White Bra!
And it’s also my first front-closing bra; I’ve been wanting to do this for a while now, mostly because I wanted to try making a bra with something beautiful on the back, a very popular lingerie look right now. So even though I’m starting with Elan’s B510 pattern, it won’t look much like that by the time I’m done! Or at least not in the back. Fair warning.
Here’s the back of my almost-finished LBWB:
This is the back of my LBWB, just prior to the final adjustment: shortening this white lace panel, because I feel it’s coming up too high on the back of the neck. (The chartreuse fabric is part of a bias slip I’m making; it was already on the dress form, and I thought it looked really cool with this bra.)
In a recent post, I asked the question uppermost in my mind at the time: Underwear… Or Not to Wear? In which I confessed my hesitations about actually wearing my beautiful new hand-made lingerie. And your responses (thank you!) were overwhelmingly in favor of a laundry compromise: Wash in the machine, but protect my delicate pieces in a mesh laundry bag.
Shown in my 14″ x 18″ bag: My Ombré-Dyed Bra and solid Panty. I’ve found, though, that I can comfortably fit at least 2 bras and several panties in this bag.
I know, I know, I said the Little White Project was over. But here’s the thing: Even after all the lengthy tutorials, the sewing, the dyeing, and the finishing, there are still some notes about making the Little White Bras/Panties/Thongs that didn’t make it into the previous posts. I feel, therefore, duty-bound to offer these tidbits here.
The Sewing Part: Little White Bras
The main difference between the first one and the second is the materials used for the cups. The first has lace on the upper/center cup pieces; for the second (the colorblocked one), I used the same Swiss dot/cup lining combination for all the cup parts. This meant that I’d have to finish the top (neckline) edge of the cups, though, so I used foldover elastic for this. (Click here for my post that includes a tutorial on applying FOE.)
The other major difference is in the bridge. For the first LWB, I unintentionally shortened the bridge by sewing a seam at the top of it; this created a gap between the top of the bridge and the top of the underwires— in other words, the wires extended up the center on either side of the bridge, past the top of the bridge. (Click here to see what I did about that little issue.)
I also decided to put the elastic trim at the bottom of the bridge; because I’d measured and cut my trim before dyeing it, I double-checked the length to make sure I would still have enough for the rest of the bra. (Notes to self: Good thing I always cut a little extra. This looks great! Must do again!) When I look at the bra as a whole, this really helps to make all the colors and trim work cohesively.
The sewing differences in my second LWB. (For this, I dyed the separate bra pieces before sewing them together.)
Yes, it’s that time. It’s the last part of my Little White Project, in which I’ll show you yet another approach to dyeing a bra and panty (okay, thong), using the same bra pattern (Kwik-Sew 3300), (mostly) same materials as the original Little White Bra, and the same 3 dye colors. But this time, I’m going to do something completely different with the dyes!
Before I get to that, here’s a quick recap of the various dyeing processes already done in this series:
My first 3 Little White projects. Clockwise from lower left: Panty dyed in all 1 color (3 dye colors mixed together), bra ombré-dyed with 3 colors, and thong ombré-dyed in 1 color. But wait— there’s more!
Hand-made lingerie is a hot topic, no doubt about it. All over the world, bras and panties are being sewn, patterns are being tested and reviewed, advice is sought and given, and the results are being photographed, talked about, and blogged about. And yet I’ve seen very little mention of the actual wearing of our hand-made lingerie. (Maybe they really are unmentionables?) Yes, there is plenty of discussion of fit issues, sewing techniques, and pattern pros and cons, but what I mean is, are we really wearing the underwear we’re making? Or just making it?
My second bra and panty set deserves a better fate than languishing in my lingerie drawer.
Now that I’ve made my Little White Panty and Little White Thong, I can’t wait to try out some of my dyeing ideas! If you’ve seen the results of dyeing my Little White Bra, you’ll know I used a dip-dyeing technique, with several colors, to create its beautiful ombré finish. This time, I’m going to do something different: the panty will be immersion-dyed in a mix of colors, and I’m going to dip-dye the thong with just 1 dye color. The kicker: I’ll be using some of the same dye colors as for my LWB, so these panties should coordinate well with the bra (fingers crossed).
No, it’s not Jekyll and Hyde, The Underwear Edition. It’s my Little White Panty, before and after dyeing!
My last post was an introduction of sorts to my current project: The Little White Bra, a.k.a. The Bra Before Dyeing (or just “Before”). Now, since this was the first time I’ve used this bra pattern, I’ll show you how I made it, including a few changes I made.
My pattern is Kwik-Sew 3300— I’m being adventurous and trying my first partial-band bra! For those of you who might not know the difference (and I’m not sure I noticed it myself before I started making bras), partial-band just means that, rather than a continuous band running all the way around the bra, including under the cups, the band comes around from the back to attach to the sides of the cups only, with a small bridge piece connecting the cups in the middle, like so:
The Little White Bra I just made, using Kwik-Sew 3300, View A with the lace upper cups and bridge. (Click the photo to see this pattern on Kwik-Sew’s site; right now it says it’s temporarily out of stock. Boo.)