Yes, it’s that time. It’s the last part of my Little White Project, in which I’ll show you yet another approach to dyeing a bra and panty (okay, thong), using the same bra pattern (Kwik-Sew 3300), (mostly) same materials as the original Little White Bra, and the same 3 dye colors. But this time, I’m going to do something completely different with the dyes!
Before I get to that, here’s a quick recap of the various dyeing processes already done in this series:
- Dyed a finished panty in a single dyebath (combining equal parts of all 3 dye colors);
- Ombré-dyed a finished thong with a single dye color;
- Ombré-dyed a finished bra with 3 separate colors.

My first 3 Little White projects. Clockwise from lower left: Panty dyed in all 1 color (3 dye colors mixed together), bra ombré-dyed with 3 colors, and thong ombré-dyed in 1 color. But wait— there’s more!

And now, the final Little White experiment: I’m going to dye my bra and thong materials before I sew them together!
I bet you saw this coming.
Remember the non-dyeing-thread snafu with my first Little White Bra? No? It’s just that when you sew your bra together first, assuming you’re using polyester thread, that thread won’t dye— so you have a beautifully-hued bra with glaringly white thread. Yes, you can sew with thread in the color you intend to dye with, but what if you have trouble matching those colors? (I did manage to come up with one solution, here.) The easiest answer, it seems to me, is to dye your materials before you sew.
Advantages to dyeing before sewing:
- If you cut your garment pieces out first, along with the correct lengths of elastics, trims, etc., you won’t waste dye on fabric that will end up in scraps.
- It’s much easier to match thread to fabric after said fabric is already dyed.
- Dyeing pieces means you can experiment with color palettes to achieve special effects like color gradients and color-blocking.
Disadvantages:
- This may not be the best approach when you’re trying a pattern for the first time— it’s a lot of work to put in, when you can’t be sure until much later that your bra or panty will fit. Would make more sense to test the fit first.
- It can be harder to visualize the finished piece, especially if you’re aiming for a color-blocked or ombré effect.
- There’s a bit more risk with the dyeing— what if you cut out all your materials, dye them, then realize 1 (or more) of the colors didn’t turn out the way you thought? You might have to re-cut and re-dye some of your pieces. (Perish the thought.)
To minimize the hard-to-picture risks, I’m following my usual procedure of laying everything out more or less as it will go together later. Here are the pieces for my Little White Bra 2 and Little White Thong 2:

Tip: When preparing my pieces for dyeing, I stay-stitched the following pieces together:
- Cup lining material to the back of all 4 cup pieces;
- Bridge layers: Swiss dot fabric to 2 layers of cup lining;
- Thong: crotch lining to front piece (both cut from the same pattern piece)
This reminds me: If you’re going to dye after cutting your pattern pieces out, you want to reduce the risk of your materials shrinking in the dye process. (This is not an issue if you’re dyeing fabrics prior to cutting your garment pieces, because you’ll be cutting after any shrinkage happens.) For most of the materials I’m using here (mostly nylon), shrinkage is generally minimal, but I still pre-wash all my fabrics prior to cutting. I don’t usually pre-shrink my elastics, but if you want to, I’d recommend soaking them in hot (not boiling) water, then laying them out to dry.
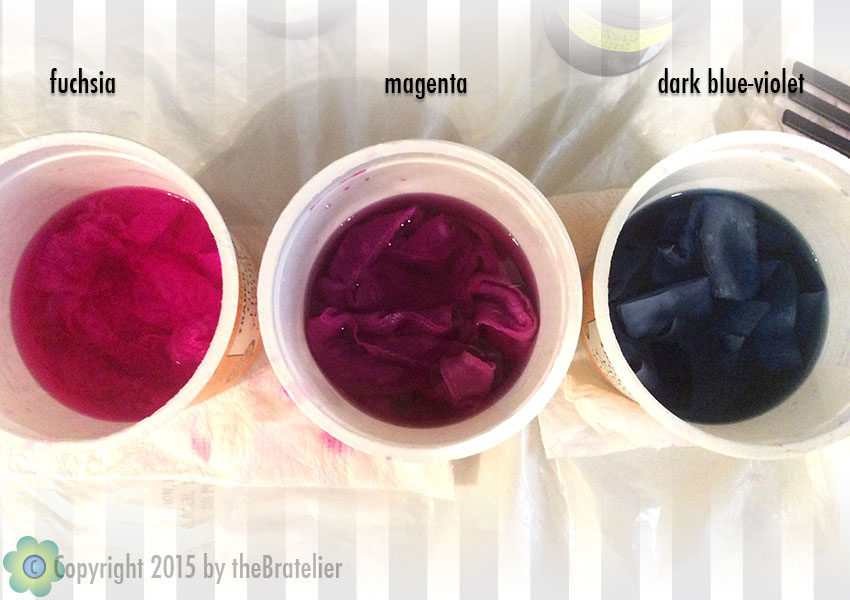
The dyeing part: It may be hard to believe, looking at the bra, panty, and thong pictured at the top of this post, but I used the exact same dye colors for them all. Yes, even the ombré bra, where it’s very hard to see any of the dark blue-violet dye.
Tip: The reason the blue-violet blends into the other shades on the bra is because these dyes are basically transparent. So if you layer 1 color on top of another, the first color will show through the second, at least a little. (This will depend on the particular colors you’re using; for example, a dark color layered over a lighter one will give a different result than if you reversed the colors.) In my ombré bra, the blue-violet layered on top of the previous fuchsia and magenta layers produces a deep violet color near the bottom of the bra.
If you want to experiment with this, try letting each color layer dry completely before dipping it in the next color. This will most likely give quite a different effect, especially if your color range has a lot of contrast!
After I decided which parts would be either fuchsia, magenta, or blue-violet, it was time to dye! (Sorry.) Since my parts were so small, I decided to dye them in large yogurt containers, adding 1 teaspoon citric acid, and very hot (180°F) water to my dye mixtures; after all the dye was absorbed, I just left them there to cool completely before rinsing and drying. (For more on the basics of dyeing, click here.)
Separating the 3 dye colors for this project makes the color differences quite clear, and also allows for some creative color-blocking. To be really honest, after I had dyed my pieces and laid them out for the post-dyeing mock-up (above), I was skeptical about how the finished bra and thong would look— the colors didn’t seem to relate to each other as well as I had hoped. But I forged ahead with the sewing anyway, and I’m glad I did! I liked these pieces so much better after they were put together!
Tip: Depending on your color palette, it may be possible to pick just 1 thread color that will blend with everything. (For my third bra, which was a range of coral, fuchsia, and rosy red, I sewed everything with fuchsia thread.) It certainly simplifies and speeds up the sewing process if you’re not always changing thread colors! In this case, the only time I changed colors was when I was working with the dark blue-violet bra closure and foldover elastic; all the rest was done with fuchsia thread, which blended surprisingly well, even with the blue-violet bands.

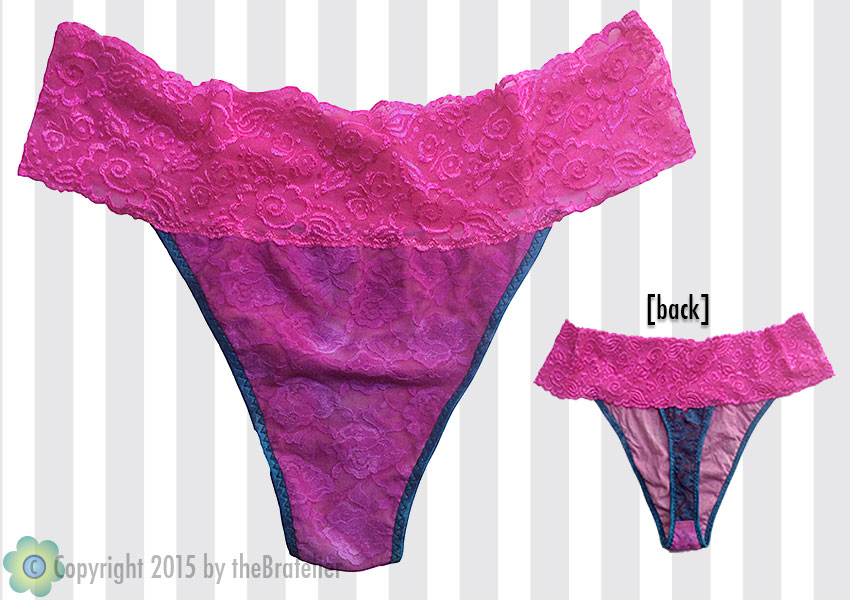
Aside: When making the bra for this project, I suddenly realized the real reason bra-makers add those little flowery embellishments.

Major epiphany, folks. End of aside.
Sigh… It’s always bittersweet when a favorite story comes to an end. But it cheers me no end when I realize how many new bras, panties, and other lingerie pieces there are to make, more experiments in fabric/color/pattern combinations to explore, color palettes to create and apply, and even some designing and pattern drafting to try! Back to the drawing board I go!
And that’s no Little White Lie.
Resources for this post:
Patterns: Bra: Kwik-Sew 3300. Thong: Kwik-Sew 3881.
Materials:
Bra strap elastic, sheer non-stretch cup lining material, underwire channeling, and heat-sealed back bra closure are all from ArteCrafts.
Foldover elastic, picot elastic trim, rings/sliders for straps, underwires, stretch lace fabric (thong front/back) and wide stretch lace trim (panty waistband) are all from Sew Sassy.
All other materials came from my local fabric stores.
Acid dyes are from Dharma Trading (Dharma brand). And here’s my post on basics of dyeing.
And P.S. I now have kits available for the original Little White Bra, and the Little White Panty!

I love it! What a gorgeous set, and what an inspiring post! Thank you. I’m all for a little cover up to hide slight imperfections. 🙂
LikeLiked by 2 people
Thank you, Michelle! I really appreciate your comments and support, not to mention your own inspirational projects! : )
LikeLiked by 1 person
What a fantastic series of posts! I learned so much. And one of the universal rules of bra-making is definitely ‘put a bow on it’ to cover any strap attachment/colour-matching issue in the front! Thanks so much for these posts!
LikeLiked by 2 people
Thank you so much, Erin!! Maybe we’ll be seeing ombré-dyed swimsuits from you one of these days, yes? : )
LikeLiked by 1 person
Lindy, Lindy, Lindy, your works never cease to amaze me! This set is simply gorgeous. You, my friend, are very talented.
LikeLiked by 1 person
You are so sweet, Elaine, thank you!! Looking forward to meeting you when you’re in town!
LikeLike
Thank you so much, Elaine!! 😀
LikeLike
OMG my new interest in sewing bras and other lingerie items COMBINED with my ALL TIME FAVOURITE PART of any textile project – dyeing. You are so awesome. Should be sewing up my first bra – a Watson – for a friend this weekend – learn the ropes re sewing elastic etc – before I tackle fitting my larger cup size.
So absolutely delighted to have found you 😍😍😍💜💜💜
LikeLiked by 1 person
Thank you so much! I’m thrilled to have you here, and to know that you’re interested in all these topics!!
LikeLike
Lovely bra! I love how the colors work together. So much more interesting than any RTW bra!
LikeLiked by 1 person
Thank you! You might be surprised how much inspiration I get from your bra posts!
LikeLike
[…] materials used for the cups. The first has lace on the upper/center cup pieces; for the second (the colorblocked one), I used the same Swiss dot/cup lining combination for all the cup parts. This meant that I’d […]
LikeLike
I love the experimental attitude with which you approach this! Well done!
LikeLiked by 1 person
[…] you think this Little Black & White Bra project is not all that different from the Little White Bra (and panty) projects, well, take a look at how those turned out! These things don’t always […]
LikeLike