My last post was an introduction of sorts to my current project: The Little White Bra, a.k.a. The Bra Before Dyeing (or just “Before”). Now, since this was the first time I’ve used this bra pattern, I’ll show you how I made it, including a few changes I made.
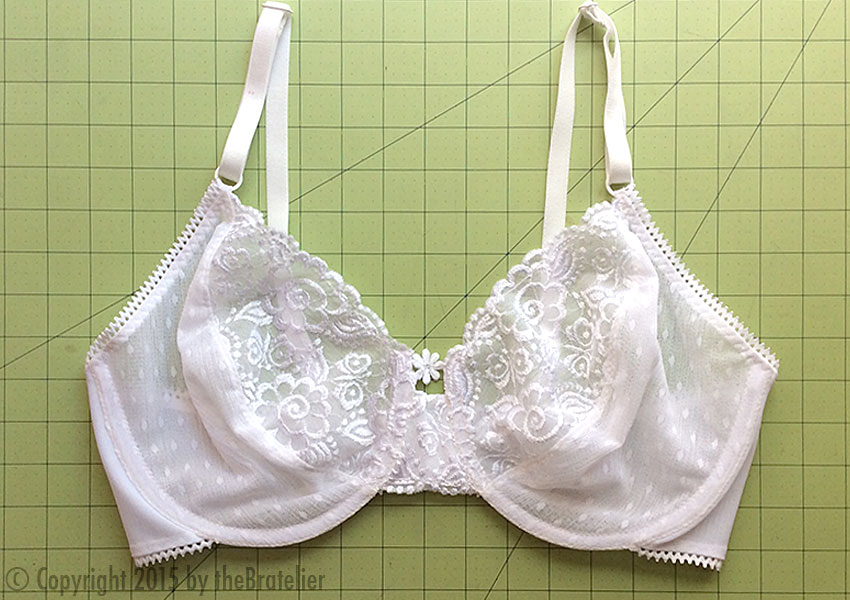
My pattern is Kwik-Sew 3300— I’m being adventurous and trying my first partial-band bra! For those of you who might not know the difference (and I’m not sure I noticed it myself before I started making bras), partial-band just means that, rather than a continuous band running all the way around the bra, including under the cups, the band comes around from the back to attach to the sides of the cups only, with a small bridge piece connecting the cups in the middle, like so:
The Little White Bra I just made, using Kwik-Sew 3300, View A with the lace upper cups and bridge. (Click the photo to see this pattern on Kwik-Sew’s site; right now it says it’s temporarily out of stock. Boo.)
So there I was, debating over new bra patterns/fabrics/colors to try, and I had this idea…
What if I made an all-white bra that was meant to be dyed? That is, rather than dyeing the materials first, then cutting and sewing, maybe I could make the bra, then dye it. Ultimately, I want to be applying my original color palettes (and their corresponding dye recipes) to my lingerie pieces, just as I’m already doing with my yarns, so this seems like a good plan.
Oh, the dilemma… To dye or not to dye?
Advantages to this approach:
It’s fairly easy to find all necessary bra-making materials in white.
I wouldn’t waste dye on materials that would end up in the scrap heap after cutting my bra pieces out.
I could take my time deciding what color I wanted my bra to be.
Or heck, I could just decide to leave it white! I was severely tempted by this thought when I was finished making this bra. And I’m pretty sure Vogue advises every woman to own at least one Little White Bra, right?
Disadvantages:
I have to think and plan very carefully about the materials I use; everything from the lace and elastic trims to the strap rings and sliders needs to be compatible with the type of dye I want to use. And speaking of which…
As a wise person on the Facebook Bra Making Forum* pointed out, don’t forget about the thread! If I’m going to use the usual polyester sewing thread, it won’t be dyeable with either the acid or RIT types of dyes. Meaning my bra will be dyed, but the thread will stay white. Probably not the look I’m going for.
It can be a little tricky maneuvering the bra around while dyeing, especially with the underwired parts being stiff and generally getting in the way. (This was mainly a problem for me because I decided to ombré-dye my bra, so it had to be dipped repeatedly into various dye baths; it shouldn’t be an issue if you’re dunking the whole bra into the dye at once. Just make sure the container you’re dyeing in is large enough.)
Unless you’re extremely lucky, it’s unlikely that all materials will dye evenly to the exact same shade, even if they’re all the same fiber. I happen to like that, but you may not.
Tip: Crash course in dye types and what they’re used for: Acid dyes (the kind I use most frequently for my yarns) work on animal fibers like wool, mohair, and silk, and also on nylon (very important to lingerie makers). Fiber-reactive dyes are used for plant fibers, such as cotton, linen, and rayon. RIT dyes are what’s known as the union-type dye, meaning they’re a combination of acid and fiber-reactive dyes, so they can be used on any natural fiber, including combinations of animal and plant fibers. I use RIT dyes most frequently for panties, since I usually make them with cotton crotch linings.
Next up: I’ll show you the making of this Little White Bra, including some minor pattern changes I made along the way. And it’ll have a link to kits to make your very own LWB!
And coming soon after that: I’ll take you through my process for ombré-dyeing this bra, including how I got around the non-dyeing-white-thread thing, plus posts on making (and dyeing) a Little White Panty!
*This is a closed group on Facebook, so if you’d like to join it (and it’s fabulous), please contact me (Lindy Thibodaux on FB) with your FB name, and I’ll send you an invitation to the group.
Resources for this post:
The bra pattern I used is Kwik-Sew 3300; right now, this page says it’s “temporarily out of stock”. Let’s hope they bring it back soon!
Bra! I meant my fourth bra! For my third, I know I said that was something completely different, and it was, especially compared to my first and second, which were both made from the same pattern. But for this one, I went even further afield. I didn’t just try a new pattern, I made a foam-lined bra!
My first attempt at a foam-lined bra! I used pattern DL02 from MakeBra.com, a beautiful ombré matte jersey and some unusual elastic trim, and I dyed straps and channeling to match. (Click the photo to check out the pattern.)
Now that I’ve got my cups sewn into my third bra project, it’s time for one of the main things I’m doing differently than the pattern (Kwik-Sew 3594): adding underwires. That is, at this phase, I’ll be adding channeling to house the underwires, which will get inserted a little later. Here’s what I’ve got so far:
With my cups sewn into the band, I’m ready to tackle the underwire channeling. (Note: The embellishments won’t get sewn in place until the very end; they’re just here right now for inspirational purposes.)
After making both my first bra and the second with the same pattern (the Marlborough Bra from Orange Lingerie), and making them both mostly out of silk, I’ve started to feel the urge to try something different. Completely different.
Here’s what I have in mind:
1. Instead of making the bra first, then trying to find stretch panty materials to coordinate, I’m going to pick my panty fabric first, then use that for the bra as well. This will mean using (gasp!) a stretch fabric for the bra, rather than woven.
Here’s the main fabric I’ve chosen for my new bra: a slinky, stretchy poly/Spandex jersey in a beautiful shade of deep coral pink. At left is narrow satin tubing destined for a bra strap idea I have, and at right is embroidered tulle I’d like to use, well, somewhere. These 3 materials form the starting point for my tonal color palette of coral, fuchsia, magenta, and rose-red.
My daughter came back from several years in Paris with the firm conviction that every bra should have at least one matching panty. And that every piece of lingerie should be the best quality you can afford. It took a little convincing, but now I quite agree with her. And I must say that, even in the short time I’ve been making my own under-goodies, I’ve noticed that there’s something about setting a matching panty down next to a bra that seems to make the bra look even better. Especially a beautiful, unique, hand-made bra!
So today I’ll show you the steps that go into making a color-blocked, high-waisted panty; I’m planning this to coordinate with my newly-finished second bra. I’ll be using my OhhhLulu Betty High-waisted Panty pattern (the same one I used when I made my first bra and panty).
Here’s my second bra, with some materials I pulled out to see if they’d coordinate:
The materials I’ve chosen to make my high-waisted panty. 1. Turquoise hand-dyed nylon/Spandex. 2. Black elastic trim (the same used on the bra). 3. Black all-over stretch lace fabric.
In Part 3 of my second bra project, we ended after adding the back bands. Now all we have to do is add the finishing touches: elastic trim, straps, and the back closure. Then we’ll slip the underwires into place, and finish off the ends of the channeling. And I just may add a little embellishment to the center front (we’ll see).
I’ll start by adding my elastic trim to the underarm/back band edge. This technique, which you’ll see on virtually any ready-to-wear bra or panty, is done in 2 separate steps. The first is to attach the elastic, wrong side facing up (very important) to the right side of the bra, using a small zig-zag stitch, and sewing very close to the inside edge— the edge closest to the picot loops.
This piece of elastic will go from the top edge of the back band (not including the scooped-out area near center back) to the end of the outside edge of the power bar.
Tip: You don’t want to stretch the elastic much while attaching it; a slight stretch going around the curve of the underarm helps to smooth that curve, but don’t stretch the elastic on the back band portion.
After making sure your elastic side is placed with the wrong side facing up, you’ll want to align the non-picot edge of your elastic with the fabric edge. Then zig-zag-stitch as close as possible to the inside edge of the elastic. (Since I’m sewing here with black thread, it’s nearly impossible to see my stitches, so I’m representing them with the small white vees by the green arrow.)
Finally! After choosing my pattern, deciding which fabrics to use, and dyeing notions and more fabrics to coordinate, now I’m on to the really fun part: sewing it all together! Today, I’ll show you step-by-step how all the major parts are sewn together, and next time, I’ll complete my bra!
Let’s jump right in! Here, I’ve cut all my fabric pieces, and laid them out in a rough mock-up of my new bra.
Note: In the interest of keeping this post to less-than-novella length, it’s not going to be a tutorial, exactly; it’s more in the nature of a quick overview of the steps involved in constructing a bra. In posts to come, I’ll go into a lot more detail about specific aspects of bra-making. (Remember, this is only my second bra!)
Another note: In this photo, the pieces with the print fabric, which is sheer, have already been basted to a second layer of silk, for stability as well as opacity.
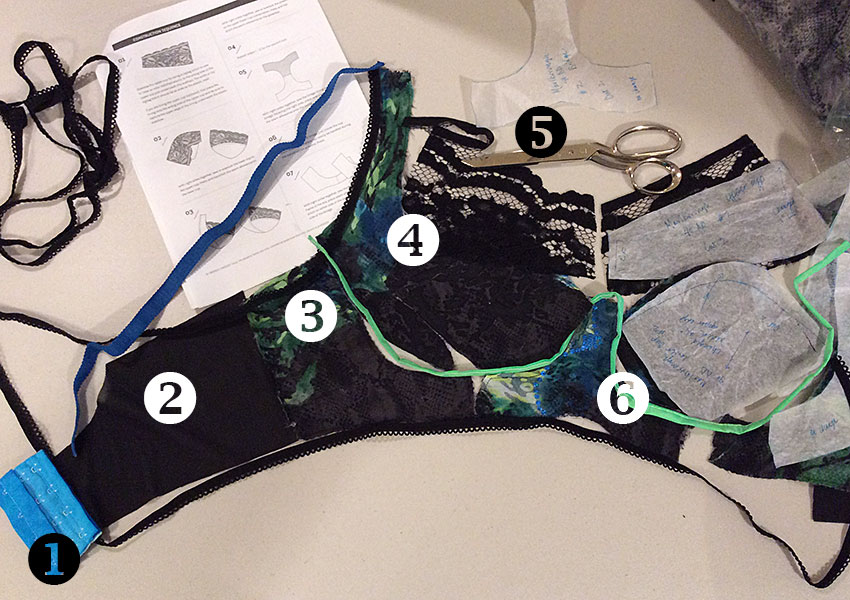
Laying out my bra pieces helps me visualize the finished bra. You can also see the blue straps, black elastic trim, and green underwire channeling (this will be on the inside of the bra). 1. Back closure (looks like this will need to be trimmed down). 2. Back band (powernet fabric). 3. Frame. Along with the bridge (6), the frame supports the cups. 4. The 3 parts of the cup: power bar (extending into strap), lower cup, and upper cup (lace). 5. Trimming the selvedge from the lace, leaving a scalloped edge for the top of the cup. 6. Bridge. This forms the support for the center of the bra, as well as under the cups.
Tip: Laying out the pieces in this way also helps avoid the possibility of forgetting a vital part! Don’t ask me how I know this.
At this point in my second bra project, I’ve chosen my pattern and assembled fabrics from my scrap stash, incidentally creating a color palette in the process.
The main elements going into my second bra: 1. Sheer silk print, to be layered over 2. Silk snakeskin print (the same fabric I used for my first bra!). 3. Black stretch lace fabric, to be layered over 4. Bamboo/spandex for coordinating panty. 5. Black picot-edge elastic trim for both bra and panty.
Now I just need to add the remaining bits and pieces that go into making a bra: channeling (this is what houses the underwires), strap material, elastic trim (for both bra and panty), powernet fabric (for the back band), and the back closure for the bra.
And here is where I come crashing right up against the dreaded, frustrating, tear-my-hair-out question:Read More »
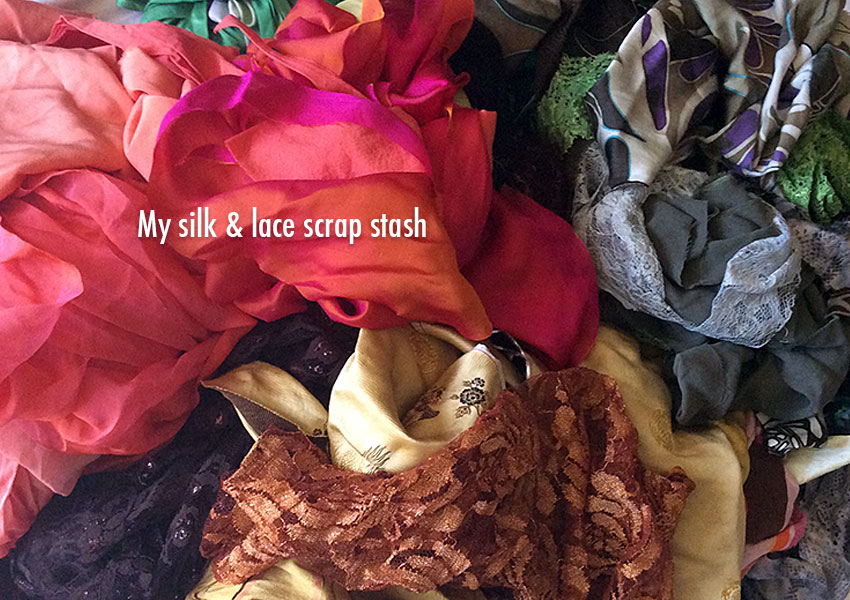
Now I’ve chosen my pattern, made a few minor alterations to it, and organized the pattern elements. With the goal of making as much of this bra as possible with materials I already have on hand, I’m anxious to pick my main fabrics. Off to my scrap stash!
Tip: Be sure to read through your bra pattern’s instructions before even thinking about fabrics. In my case, my pattern specifies fabrics with no stretch for every part except the back bands, which use powernet. But some of the patterns I’ve looked at, especially the bralette and some foam-lined styles, call for fabrics with stretch. My pattern also calls for non-stretch lace for the upper part of the cups.
Quite an impressive pile, isn’t it? Out of my total stash, I pulled just silk and lace fabrics; the silks range from chiffon and georgette to crepe de chine, charmeuse, twill, and brocade. Some of these will hopefully become the main ingredients in my new lingerie wardrobe!