If you’ve been following my first Little White Bra project, you’re probably waiting in breathless anticipation for the dyed version I promised you— and now it’s here! I’ll show you my process for ombré-dyeing this bra, and I’ll even clue you in to how I dealt with that pesky non-dyeing white sewing thread!
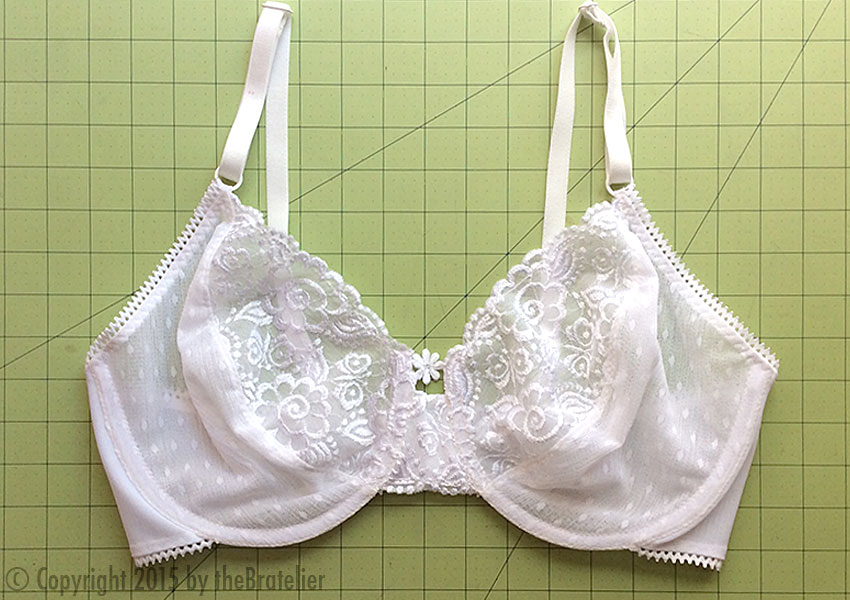
But first, here’s the Before version, a.k.a. The Little White Bra:
How did I do it, you ask?
Aside: Actually, I think the more important question is WHY? When I could have simply dunked the whole bra into a single color, why would I complicate things? Well, here’s the thing. Okay, one of the things. I like to experiment. And I’ve dyed plenty of things (okay, a few) in solid colors. So for this project, I was not only experimenting to find a good method for ombré-dyeing a slightly awkward thing like a bra, I was also trying to determine exactly how much dye it takes to color one bra. This way, I got as much information as possible from just one project— creative nirvana. End of aside.
On to the dyeing part! As I mentioned in Part 1 of this series, the most important issue to resolve at the start is fibers that are all compatible with the type of dye you want to use. In this case, since my bra materials were almost 100% nylon, I used acid dyes. I mixed my own colors with the intention of creating a subtle color gradient, but you can get similar results by using fuchsia (Color 1), magenta (Color 2), and deep purple (Color 3).
My process:
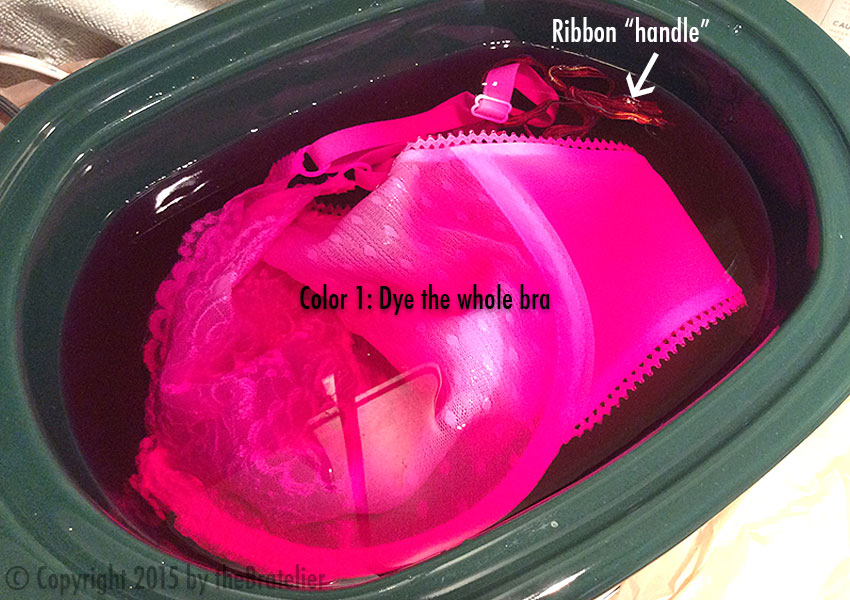
- Pre-soak bra; while it soaks, mix dye colors (I used 3) and prepare dye bath with Color 1 (lightest color). Tie scrap ribbon or string (about 8″ long) through bra straps, forming handle.
- Put entire bra into dye bath until Color 1 is completely absorbed.

My pre-soaked bra has taken the plunge! It will heat in this dye bath until Color 1 has been absorbed. Note the ribbon handle that’s connecting the 2 bra straps. Also note that colors will look considerably lighter after the bra has dried. (And yes, that is a crock-pot, which is only used for dyeing, not for food.) - Take bra out; add Color 2 (medium) to bath; holding bra by ribbon handle, lower bra about 2/3 of the way in (to about 2″ below the top of the cups); let rest of bra hang outside the pot until Color 2 is absorbed.

Because the underwires make the bra pretty rigid, it was a little tricky figuring out how to handle dipping it part of the way in; the ribbon handle helps with this. I’ve got large plastic bags spread over everything when dyeing, so I can just lay the upper part of the bra on them. (In this photo, I’ve only just dipped the bra in to the darker Color 2; it will take about 20 minutes to absorb.) - Repeat Step 3, adding Color 3, and lowering bra about 1/3 of the way in (to about the level of the top of the back band at center back), letting the rest of the bra hang outside the pot until Color 3 is absorbed.
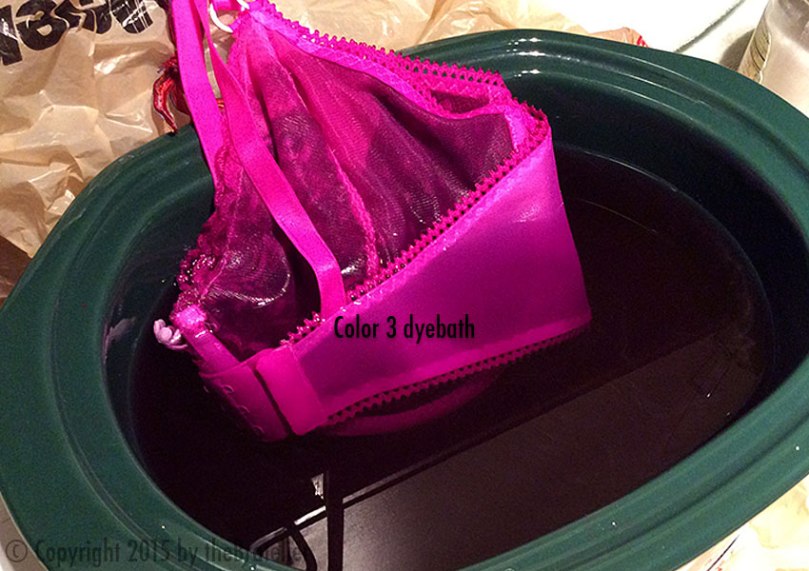
On to Color 3! Again, the bra has just gone in, but you can see the deep purple starting to absorb into the lower 1/3 of the bra. - Leave the bra in dyebath until bath is completely cool; rinse; hang to dry.


Tip: This post is more about the process of ombré dyeing, rather than a comprehensive dyeing tutorial. I’ve included a few basics about dye types in my first Dye-IY post, and now I’m working on a post that will cover dyeing in more depth, i.e. more information than you will find on the dye packages, and based on my own experience. (I’ve been dyeing a line of yarns since January 2014, among other things.) and I’ll add a link at the bottom of this post when the dyeing one is ready. Definitely follow the directions on your dye package! And there are lots of good tutorials at Dharma Trading, the supplier for my acid dyes and related supplies. And feel free to ask me questions!
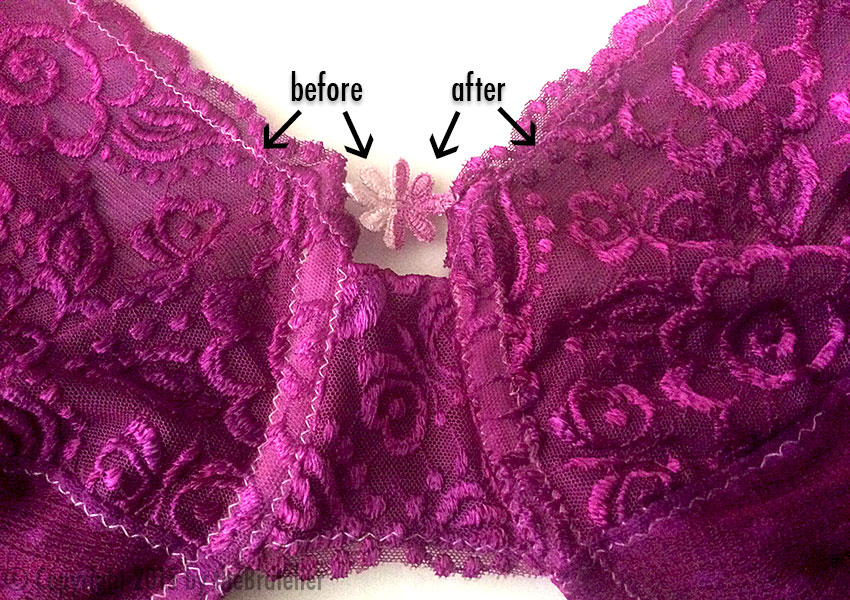
And the dyeing part is done! Now: Remember me mentioning the issue of sewing thread color in my first Dye-IY post? Well, it’s true— typical polyester sewing thread will not dye with acid dyes; polyester uses a special dye type. I did know that going into this project; I used white thread anyway because I wanted to see if I could figure out a solution (another experiment!).
Tip: If you’re dyeing a ready-to-wear bra, there’s a good chance it was sewn with nylon thread, so you may not have this issue at all! Lucky you! Go forth and dye!
After my bra dried (remarkably quickly), here’s a close-up view of what it looks like, white thread and all:

Some of my friends on the Bra-making Forum (the Facebook group mentioned in the first Dye-IY post) say that the thing to do is, when you’re sewing your white bra prior to dyeing, use thread in the color you intend to dye the bra. Well, what if you don’t know ahead of time what that color might be? And another issue: once you’ve sewn the bra with a particular color, then you have to make sure your dye mixture is the right color to match that thread— harder to do than you might think. Don’t ask me how I know.
So what’s the answer? I think there are several ways to go, depending on your project:
- As mentioned above, sew your bra with thread in the color you want to dye your bra. This could work well if you’re quite good at mixing dye colors to get a specific result, or if you don’t mind if the colors don’t match exactly. It could also work in a case like mine, where you’re ombré-dyeing— since you’re using several dye colors, you can pick your thread to match one of them (preferably the mid-tone), and it should blend with the others.
- Leave your thread white. This might work well if your fabric is a print, for example, with fairly light colors; there’s at least a chance that the white will blend in. Or, if you’re dyeing your bra a dark color, you can simply embrace the contrast!
- Use a thread made with something other than polyester. At a recent trip to my fabric store, I found 100% cotton and 100% silk threads; the silk thread will dye with acid dyes, and RIT dyes will work on the cotton.
- After dyeing your bra with your chosen dyes, and letting it dry, dye it again with dye that is specifically for polyester. The other fibers should not absorb it, only the polyester thread. (Disclaimer: I haven’t actually tried this myself. Yet.)
Or (and we definitely need a drum roll here) do what I did: Get yourself some permanent fabric markers and color in all those white bits!

Tip: Make sure you read the package to make sure they’ll work on the fabric type(s) your bra is made of; many that I picked up in the store (I got mine at JoAnn) said they were for cotton or rayon— these will not work on nylon.
Cover me, I’m going in!

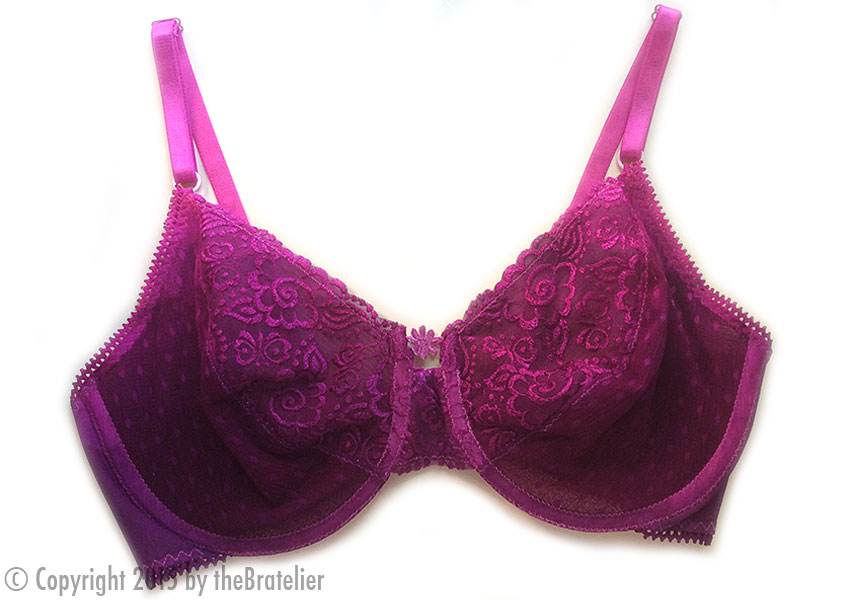
Once again, I give you… The Little White Bra that Was!
Next up in this series: The first Little White Panty! And I’ll also add a link here when I finish up my Dyeing Primer.
And don’t forget, if you’d like to make your very own Little White Bra, I now have kits available with the same materials I used for this one! My kits have everything you need to make this bra, but they do not include patterns, underwires, or dyes.

Love this! And love your little secret weapon. The bra looks lovely.
LikeLiked by 1 person
It looks AMAZING! the colors you chose are inspiring!
LikeLiked by 1 person
I was going to suggest coloring the white thread with a fabric marker, but looks like you beat me to the punch! 😉 This dye job is lovely–can’t wait to see what else you make!
LikeLiked by 1 person
Love love LOVE the little flower detail! And your eye job came out so beautifully! My only dye attempt so far was a disaster, but I’m thinking I’ll have to giv it another go!
LikeLiked by 1 person
[…] coming soon after that: I’ll take you through my process for ombré-dyeing this bra, including how I got around the non-dyeing-white-thread thing, plus posts on making (and dyeing) a […]
LikeLike
[…] Next in this series: I’ll show you how I ombré-dyed my Little White Bra! […]
LikeLike
You really mastered this one! The color is wonderful! I have a whole box of acid dyes, that I’ve used for wool fabric, yarn, and fleece! Now I know what else I could use them on!
LikeLiked by 1 person
Hi
I LOVE THIS. I have most experience with procion dyes – but have dyed some yarn with acid dye. I presume you use the crock pot to keep the temp up during the dyeing process. I have not yet stitched my first bra and have seen articles elsewhere on dyeing elastic etc – so good to know I can buy white and then do what I want with the resulting garment. I am so enjoying my research on bra making – and your article feels a bit like the icing on the cake 😉😉
LikeLiked by 1 person
Beautiful! Thanks for sharing your tips.
LikeLiked by 1 person
[…] done several posts that at least touched on dyeing various bra parts, plus my most recent project, ombré-dyeing an entire bra. So I’ve decided it’s about time I included a few tips on the art of dyeing […]
LikeLike
[…] my Little White Bra project, after it was dyed? Well, today is all about its coordinating Little White Panty! I’ll show […]
LikeLike
[…] I can’t wait to try out some of my dyeing ideas! If you’ve seen the results of dyeing my Little White Bra, you’ll know I used a dip-dyeing technique, with several colors, to create its beautiful […]
LikeLike
[…] Ombré-dyed a bra with 3 separate colors. […]
LikeLike
[…] to each other— even though each piece was dyed differently. 1. Solid-color panty. 2. 3-color Ombré-dyed bra. 3. Piece-dyed thong. 4. Piece-dyed bra. 5. 1-color-ombré-dyed thong. These 5 pieces make a nice […]
LikeLike
[…] in my 14″ x 18″ bag: My Ombré Bra and solid Panty. I’ve found, though, that I can comfortably fit at least 2 bras and several […]
LikeLike
What kind of dyes did you use? Please let me know, thanks
LikeLiked by 1 person
Hi Jess! I have another post that explains my dyeing process in detail, including the type of dye, here: https://mybratelier.com/2015/06/22/dye-iy-a-lesson-on-dyeing/
Let me know if you have any other questions!
LikeLike