After doing all my thong pattern modifications and getting the fabric and lace pieces cut and ready, I’m so excited to actually sew it together! I have a feeling this part will go faster. You know that saying, “Measure twice, cut once”? I think that applies perfectly to sewing projects— taking the time to prepare the patterns and fabric pieces maybe won’t guarantee a perfect result, but it does give you a heck of a head start.
My daughter came back from several years in Paris with the firm conviction that every bra should have at least one matching panty. And that every piece of lingerie should be the best quality you can afford. It took a little convincing, but now I quite agree with her. And I must say that, even in the short time I’ve been making my own under-goodies, I’ve noticed that there’s something about setting a matching panty down next to a bra that seems to make the bra look even better. Especially a beautiful, unique, hand-made bra!
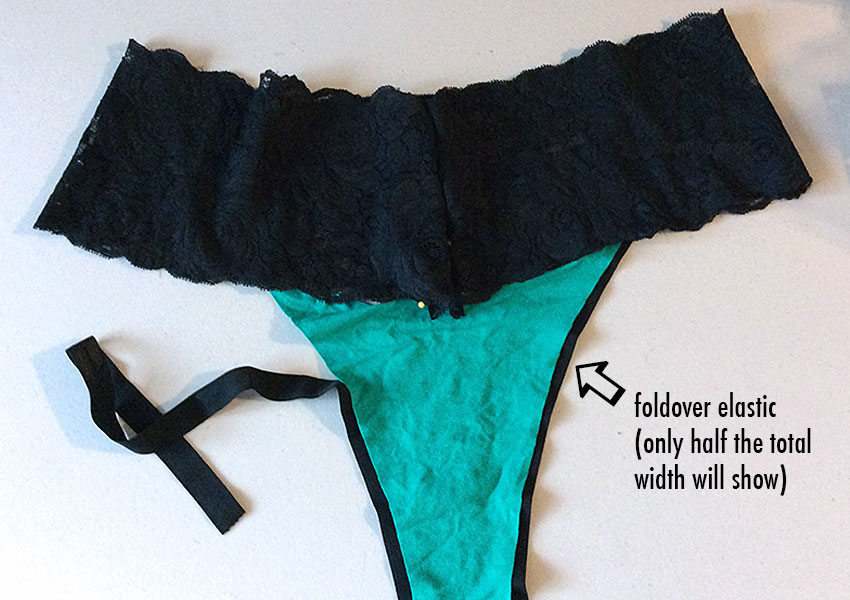
So today I’ll show you the steps that go into making a color-blocked, high-waisted panty; I’m planning this to coordinate with my newly-finished second bra. I’ll be using my OhhhLulu Betty High-waisted Panty pattern (the same one I used when I made my first bra and panty).
Here’s my second bra, with some materials I pulled out to see if they’d coordinate:
The materials I’ve chosen to make my high-waisted panty. 1. Turquoise hand-dyed nylon/Spandex. 2. Black elastic trim (the same used on the bra). 3. Black all-over stretch lace fabric.
Finally! After choosing my pattern, deciding which fabrics to use, and dyeing notions and more fabrics to coordinate, now I’m on to the really fun part: sewing it all together! Today, I’ll show you step-by-step how all the major parts are sewn together, and next time, I’ll complete my bra!
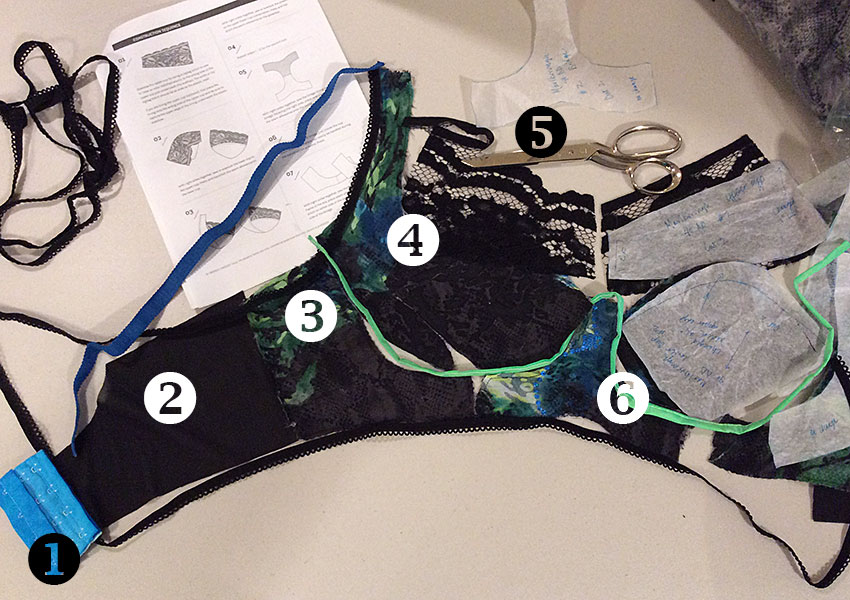
Let’s jump right in! Here, I’ve cut all my fabric pieces, and laid them out in a rough mock-up of my new bra.
Note: In the interest of keeping this post to less-than-novella length, it’s not going to be a tutorial, exactly; it’s more in the nature of a quick overview of the steps involved in constructing a bra. In posts to come, I’ll go into a lot more detail about specific aspects of bra-making. (Remember, this is only my second bra!)
Another note: In this photo, the pieces with the print fabric, which is sheer, have already been basted to a second layer of silk, for stability as well as opacity.
Laying out my bra pieces helps me visualize the finished bra. You can also see the blue straps, black elastic trim, and green underwire channeling (this will be on the inside of the bra). 1. Back closure (looks like this will need to be trimmed down). 2. Back band (powernet fabric). 3. Frame. Along with the bridge (6), the frame supports the cups. 4. The 3 parts of the cup: power bar (extending into strap), lower cup, and upper cup (lace). 5. Trimming the selvedge from the lace, leaving a scalloped edge for the top of the cup. 6. Bridge. This forms the support for the center of the bra, as well as under the cups.
Tip: Laying out the pieces in this way also helps avoid the possibility of forgetting a vital part! Don’t ask me how I know this.