Now that I’m finished making my third bra, I wanted to do a quick follow-up about the bikini panty I made to go with it. I’ve used the same pattern as for my thong, Kwik-Sew 3881, which includes a total of 4 styles; hipsters and briefs are the other two.
After making some fairly substantial changes in the bra pattern, I’ve decided (for once) to keep this panty simple: just coral poly/Spandex (the same fabric I used for the bra cups) and foldover elastic. Oh, and I saved one of the little flower thingies to use as an embellishment!

Tip: I dyed all these materials except the main fabric (2 in photo); they were all dyed in the same fuchsia dye bath, but there’s quite an interesting range of hues! Personally, I prefer this kind of tonal range to struggling to exactly match a given color (it’s just easier, for one thing).
For more about dyeing your lingerie materials, see these posts: All the Pretty Pieces: Dyeing to Match (or Not), and All the Pretty Pieces, Postscript: Dyed to Match.
One thing I’ve learned from the other panties I’ve made so far: I definitely prefer to have the crotch lining installed so that there are no exposed seams or raw fabric edges. (Both the high-waist panties and the thong have one seam that’s enclosed, but the opposite end of the lining is just sort of lying there.) Fortunately, this pattern shows how to put in the lining so that the seams attaching the separate crotch piece and the crotch lining to the back and front are both enclosed! (Note that this only applies to patterns where the crotch piece is cut separately from the front and back.) Here’s how it’s done.
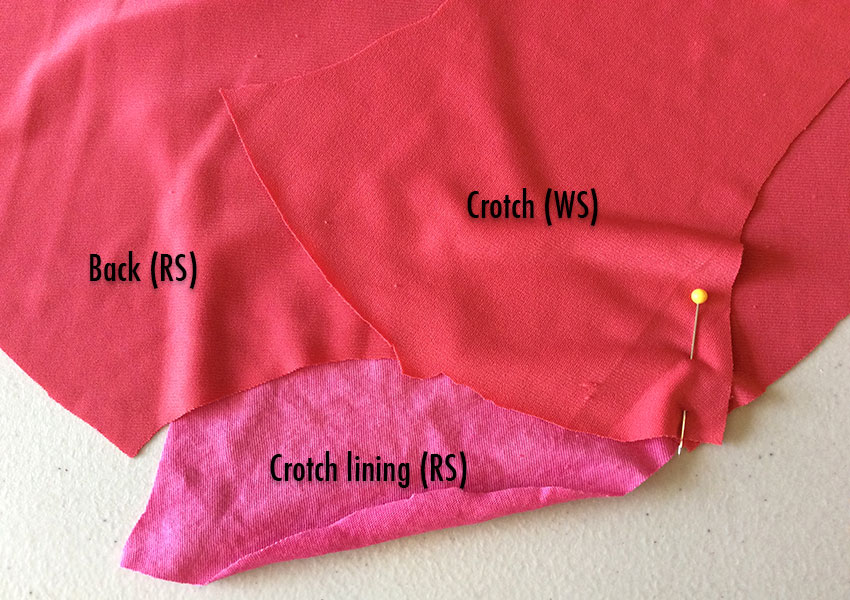
1. Pin the crotch piece to the back, right sides (RS) together. Then pin the RS of the crotch lining to the wrong side (WS) of the back piece. Stitch seam.
After stitching the seam, turning it right-side out, and pressing, this is what it looks like:


2. Lay your front piece down, RS facing up. Lay the back/crotch on top of it, WS facing up. Pin the crotch piece (not the lining) to the crotch edge of the front piece.
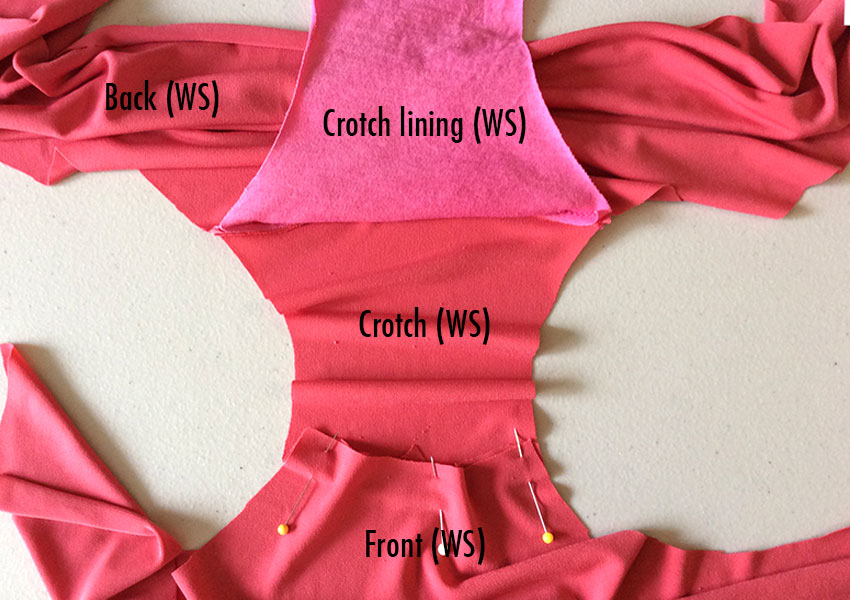
Tricky part: Now pick up the free end of the crotch lining piece, and pull it upwards, towards the top (waist edge) of the pieces, then all the way around the back, under the front piece, until it lines up with crotch seam you just pinned; pin the lining in place so that you can sew through all 3 layers once again.
Here’s what it will look like (weird, I know, but oddly fascinating, like towel origami):

Once the seam is sewn, flip the whole thing right-side out, and…

And that’s the hardest part of this panty, done! All that’s left is sewing the side seams and putting on the elastic trim!
After sewing the short little side seams, I pressed my seams open and topstitched on both sides, to keep these seams as flat as possible:

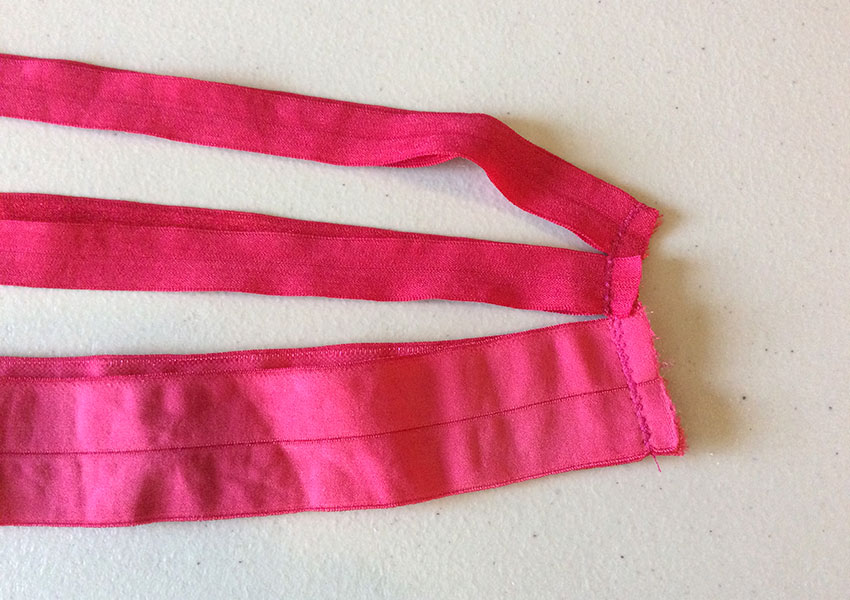
I like to stitch across all my elastic pieces at the same time; I’ve double-stitched each seam.
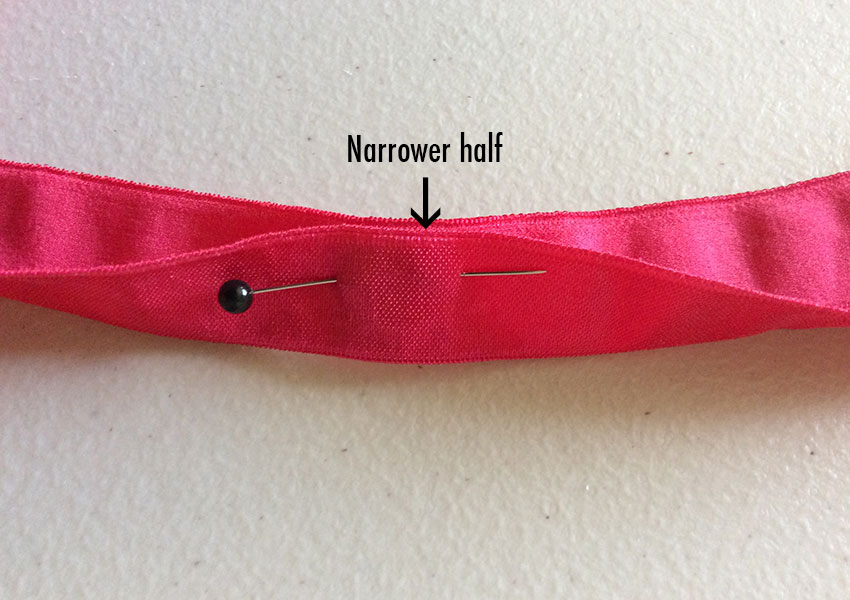
Since I’m really new to using foldover elastic, just to make sure I put it on the right way, I like to pin it in half to find the side that’s just slightly narrower than the other; the wider half goes on the WS.
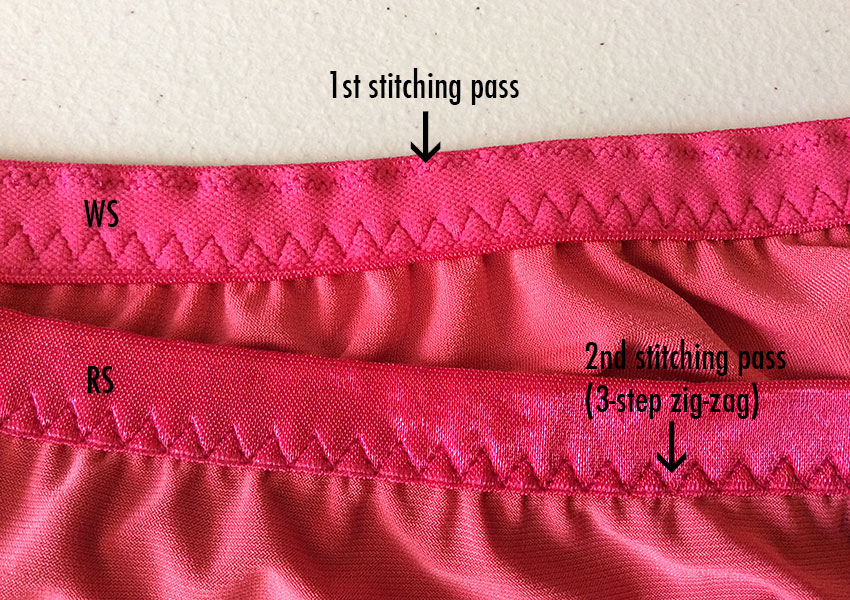
Tip: I know some people sew on their foldover elastic all in one step, but until I get more practice with it, I find it much easier (read: less stressful) to do it in 2 stitching passes. This is, of course, a matter of preference.
With WS together, match the elastic seam with one of the side seams, lining up the fabric edge just under the fold line of the elastic.

Here’s what it looks like after the 1st stitching pass:

After folding my elastic over the edge to the RS, for the 2nd stitching pass, I use my 3-step zig-zag (but you can use a regular zig-zag if you like— just make it fairly wide).
Now I’m just going to repeat this whole procedure to attach the narrower foldover elastic to the legs. After that’s done, I just want to put on my little embellishment:

It’s done!

And just for a bit of context, here it is with the coordinating bra:

Aaack— I just realized that, now that this project is finished, I have to decide what to do next! There are lots of things on my want-to-make list, including a bra with a foam cup, a front-closing bra with something really cool on the back, maybe a sports bra… Stay tuned to find out what’s up next!
Update: I’ve just listed kits to make this panty in my new Etsy shop, theBratelier!

[…] Before I put on my mesh trim, I think I’d better take care of the crotch lining. Since this pattern has a separate crotch piece (meaning it gets seamed to the panty at both ends), I’m going to use my both-seams-enclosed method for a nice finish. You can find complete instructions for this method in this panty post. […]
LikeLike
[…] by putting a wide stretch lace band straight across the top. I also used this pattern to make a bikini panty. (Click the photo to go to this pattern on Kwik-Sew’s […]
LikeLike
[…] have to finish the top (neckline) edge of the cups, though, so I used foldover elastic for this. (Click here for my post that includes a tutorial on applying […]
LikeLike