I know, I know, I said the Little White Project was over. But here’s the thing: Even after all the lengthy tutorials, the sewing, the dyeing, and the finishing, there are still some notes about making the Little White Bras/Panties/Thongs that didn’t make it into the previous posts. I feel, therefore, duty-bound to offer these tidbits here.
The Sewing Part: Little White Bras
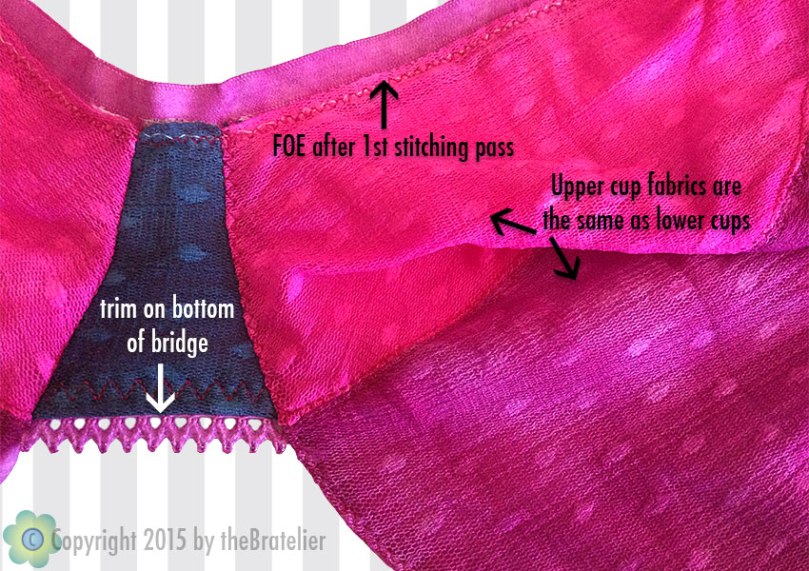
The main difference between the first one and the second is the materials used for the cups. The first has lace on the upper/center cup pieces; for the second (the colorblocked one), I used the same Swiss dot/cup lining combination for all the cup parts. This meant that I’d have to finish the top (neckline) edge of the cups, though, so I used foldover elastic for this. (Click here for my post that includes a tutorial on applying FOE.)
The other major difference is in the bridge. For the first LWB, I unintentionally shortened the bridge by sewing a seam at the top of it; this created a gap between the top of the bridge and the top of the underwires— in other words, the wires extended up the center on either side of the bridge, past the top of the bridge. (Click here to see what I did about that little issue.)
I also decided to put the elastic trim at the bottom of the bridge; because I’d measured and cut my trim before dyeing it, I double-checked the length to make sure I would still have enough for the rest of the bra. (Notes to self: Good thing I always cut a little extra. This looks great! Must do again!) When I look at the bra as a whole, this really helps to make all the colors and trim work cohesively.
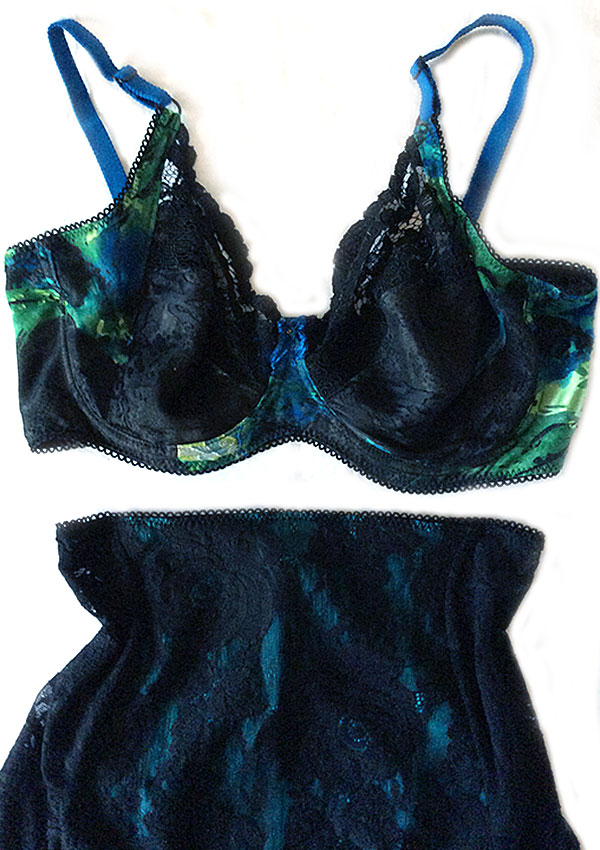
The sewing differences in my second LWB. (For this, I dyed the separate bra pieces before sewing them together.)
Yes, it’s that time. It’s the last part of my Little White Project, in which I’ll show you yet another approach to dyeing a bra and panty (okay, thong), using the same bra pattern (Kwik-Sew 3300), (mostly) same materials as the original Little White Bra, and the same 3 dye colors. But this time, I’m going to do something completely different with the dyes!
Before I get to that, here’s a quick recap of the various dyeing processes already done in this series:
My first 3 Little White projects. Clockwise from lower left: Panty dyed in all 1 color (3 dye colors mixed together), bra ombré-dyed with 3 colors, and thong ombré-dyed in 1 color. But wait— there’s more!
Hand-made lingerie is a hot topic, no doubt about it. All over the world, bras and panties are being sewn, patterns are being tested and reviewed, advice is sought and given, and the results are being photographed, talked about, and blogged about. And yet I’ve seen very little mention of the actual wearing of our hand-made lingerie. (Maybe they really are unmentionables?) Yes, there is plenty of discussion of fit issues, sewing techniques, and pattern pros and cons, but what I mean is, are we really wearing the underwear we’re making? Or just making it?
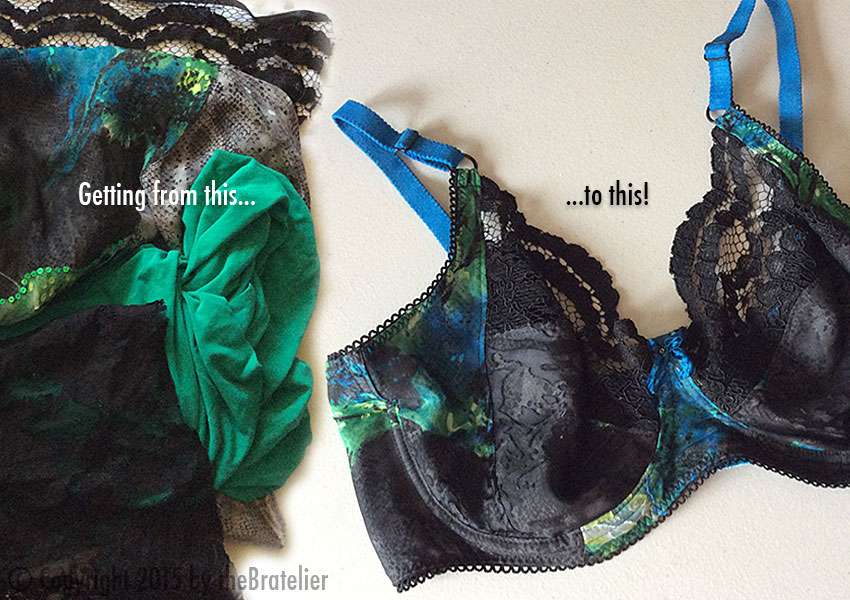
My second bra and panty set deserves a better fate than languishing in my lingerie drawer.
Now that I’ve made my Little White Panty and Little White Thong, I can’t wait to try out some of my dyeing ideas! If you’ve seen the results of dyeing my Little White Bra, you’ll know I used a dip-dyeing technique, with several colors, to create its beautiful ombré finish. This time, I’m going to do something different: the panty will be immersion-dyed in a mix of colors, and I’m going to dip-dye the thong with just 1 dye color. The kicker: I’ll be using some of the same dye colors as for my LWB, so these panties should coordinate well with the bra (fingers crossed).
No, it’s not Jekyll and Hyde, The Underwear Edition. It’s my Little White Panty, before and after dyeing!
Remember my Little White Bra project, after it was dyed? Well, today is all about its coordinating Little White Panty! I’ll show you how I made it, along with a Little White Thong; in my next post, I’ll show you how I dyed them. (Teaser alert: I used 2 different techniques— but they both work with my ombré-dyed LWB!) And coming soon: I’ll show you 3 different ways to apply the same dye colors I used for all my Little White projects, so you can make a complete set of coordinating (not matchy-matchy) lingerie pieces!
Let’s start with the Little White Panty. You may recognize this pattern; it’s MakeBra’s DL21, the same one I used for my Ombré Panty. What a difference a fabric choice makes!
My Little White Panty was made with MakeBra’s DL21 pattern, with (as usual) some slight modifications. (Click the photo to go to this pattern on MakeBra’s site.)
I’ve been sewing since I was 5 years old, and have been making most of my own clothes since my pre-teen days. I remember making iconic items like tie-back flutter-sleeved tunic tops and satin newsboy caps for my school friends by the time I was in fifth grade. (Don’t judge me— it was the ’70s.)
But regardless of all my sewing experience, I’ve found that there is always something more to learn. And my recent venture into the previously unknown-to-me sewing territory of bra-making is proving to be no exception.
I’ve learned a lot of new things about sewing since starting to make my own bras!
Here are 3 things I’ve learned from sewing bras.Read More »
DANGER: Crash course ahead! Be advised that reading this post involves a distinct risk of dyeing. Color-mixing may be addictive, ombré effects can become an obsession, and friends may beg you to dye for them. Before proceeding through the following, ask yourself if you can handle the risks. Then ask your blogger if dyeing is right for you.
I’ve done several posts that at least touched on dyeing various bra parts, plus my most recent project, ombré-dyeing an entire bra. So I’ve decided it’s about time I included a few tips on the art of dyeing gracefully.
If you’ve been following my first Little White Bra project, you’re probably waiting in breathless anticipation for the dyed version I promised you— and now it’s here! I’ll show you my process for ombré-dyeing this bra, and I’ll even clue you in to how I dealt with that pesky non-dyeing white sewing thread!
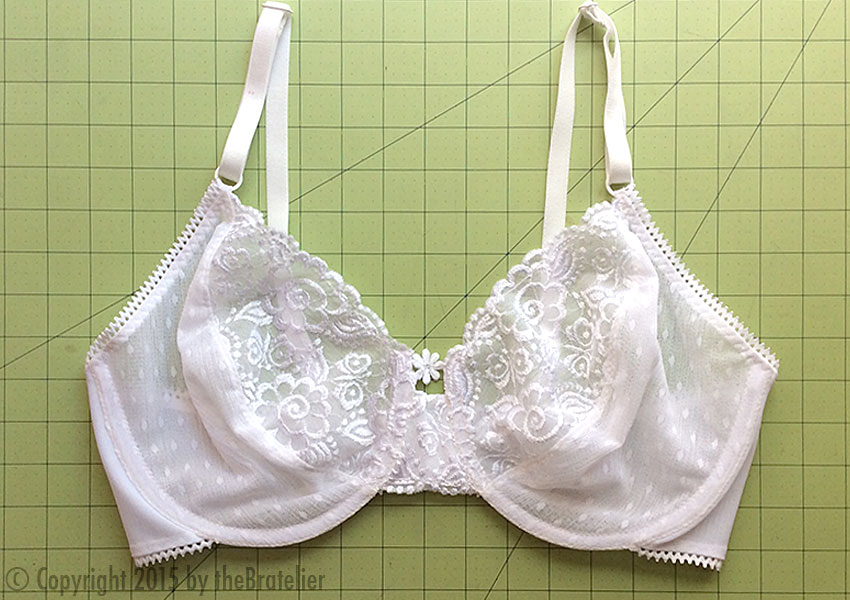
But first, here’s the Before version, a.k.a. The Little White Bra:
Before: The Little White Bra. WARNING: Dramatic After shot coming up!
My last post was an introduction of sorts to my current project: The Little White Bra, a.k.a. The Bra Before Dyeing (or just “Before”). Now, since this was the first time I’ve used this bra pattern, I’ll show you how I made it, including a few changes I made.
My pattern is Kwik-Sew 3300— I’m being adventurous and trying my first partial-band bra! For those of you who might not know the difference (and I’m not sure I noticed it myself before I started making bras), partial-band just means that, rather than a continuous band running all the way around the bra, including under the cups, the band comes around from the back to attach to the sides of the cups only, with a small bridge piece connecting the cups in the middle, like so:
The Little White Bra I just made, using Kwik-Sew 3300, View A with the lace upper cups and bridge. (Click the photo to see this pattern on Kwik-Sew’s site; right now it says it’s temporarily out of stock. Boo.)
So there I was, debating over new bra patterns/fabrics/colors to try, and I had this idea…
What if I made an all-white bra that was meant to be dyed? That is, rather than dyeing the materials first, then cutting and sewing, maybe I could make the bra, then dye it. Ultimately, I want to be applying my original color palettes (and their corresponding dye recipes) to my lingerie pieces, just as I’m already doing with my yarns, so this seems like a good plan.
Oh, the dilemma… To dye or not to dye?
Advantages to this approach:
It’s fairly easy to find all necessary bra-making materials in white.
I wouldn’t waste dye on materials that would end up in the scrap heap after cutting my bra pieces out.
I could take my time deciding what color I wanted my bra to be.
Or heck, I could just decide to leave it white! I was severely tempted by this thought when I was finished making this bra. And I’m pretty sure Vogue advises every woman to own at least one Little White Bra, right?
Disadvantages:
I have to think and plan very carefully about the materials I use; everything from the lace and elastic trims to the strap rings and sliders needs to be compatible with the type of dye I want to use. And speaking of which…
As a wise person on the Facebook Bra Making Forum* pointed out, don’t forget about the thread! If I’m going to use the usual polyester sewing thread, it won’t be dyeable with either the acid or RIT types of dyes. Meaning my bra will be dyed, but the thread will stay white. Probably not the look I’m going for.
It can be a little tricky maneuvering the bra around while dyeing, especially with the underwired parts being stiff and generally getting in the way. (This was mainly a problem for me because I decided to ombré-dye my bra, so it had to be dipped repeatedly into various dye baths; it shouldn’t be an issue if you’re dunking the whole bra into the dye at once. Just make sure the container you’re dyeing in is large enough.)
Unless you’re extremely lucky, it’s unlikely that all materials will dye evenly to the exact same shade, even if they’re all the same fiber. I happen to like that, but you may not.
Tip: Crash course in dye types and what they’re used for: Acid dyes (the kind I use most frequently for my yarns) work on animal fibers like wool, mohair, and silk, and also on nylon (very important to lingerie makers). Fiber-reactive dyes are used for plant fibers, such as cotton, linen, and rayon. RIT dyes are what’s known as the union-type dye, meaning they’re a combination of acid and fiber-reactive dyes, so they can be used on any natural fiber, including combinations of animal and plant fibers. I use RIT dyes most frequently for panties, since I usually make them with cotton crotch linings.
Next up: I’ll show you the making of this Little White Bra, including some minor pattern changes I made along the way. And it’ll have a link to kits to make your very own LWB!
And coming soon after that: I’ll take you through my process for ombré-dyeing this bra, including how I got around the non-dyeing-white-thread thing, plus posts on making (and dyeing) a Little White Panty!
*This is a closed group on Facebook, so if you’d like to join it (and it’s fabulous), please contact me (Lindy Thibodaux on FB) with your FB name, and I’ll send you an invitation to the group.
Resources for this post:
The bra pattern I used is Kwik-Sew 3300; right now, this page says it’s “temporarily out of stock”. Let’s hope they bring it back soon!